


This guide is the second tutorial in our multi-part series on interacting with the Astroport protocol using Terra.js. In our first tutorial, we covered creating pairs and providing liquidity. In this tutorial, we will cover step-by-step walkthroughs for swapping tokens and multihop swapping all through the command line.
1. Set up
Note that this section is not new and was first released in our previous tutorial in this series. We will be including this as a general section moving forward for convenience. If you’re caught up with the previous tutorial, feel free to skip this section.
Prerequisites
This tutorial uses the latest stable versions of node.js and node package manager. For more information on node.js, visit https://nodejs.org.
Installing Terra.js
Open up your terminal and change the directory to your Desktop or whichever root folder you wish to host your project on.
Make a new directory folder for your project and change the directory to your new folder.
Initialize a package.json file and node modules. You will be prompted to approve metadata for your project.
Install terra.js.
Export node options for async functions to execute properly with terra.js.
Getting started with Terra.js
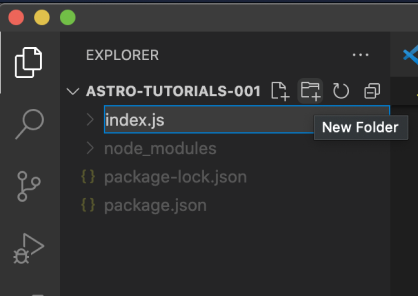
Open up a code editor with your new folder and create an index.js file. Terra.js reads this as the root file which will be used to execute node commands in the terminal.
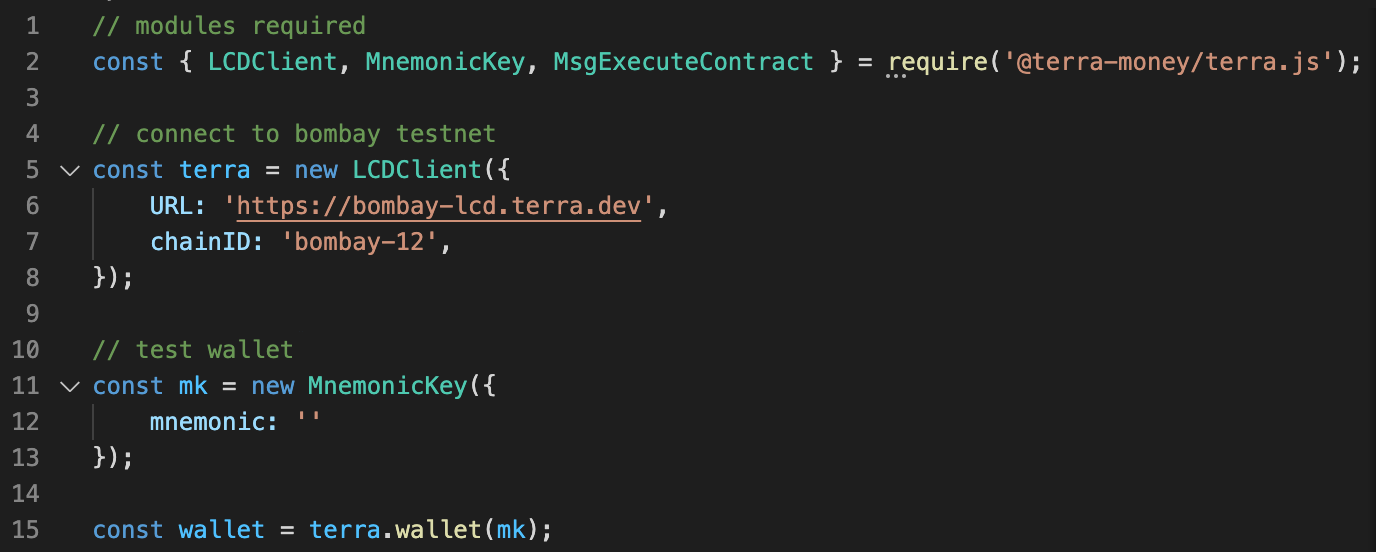
For this tutorial, you will need the following modules in your index.js file: LCDClient to connect to the Terra blockchain, MnemonicKey to sign and confirm transactions, and MsgExecuteContract to process and execute messages.
To get started, you will need to connect to the Terra blockchain. We will be using the bombay-12 testnet for now, but you can also use the mainnet or a localterra network. For more information, visit here.
After you’ve connected to the Terra blockchain, you will need to input a 24-word mnemonic key and set up a terra.wallet to sign and confirm transactions. Note that this is the quickest way to get started, but it does leave your private key exposed on your current file. For enhanced security, consider hosting your key on a separate file or other alternatives.
This is how the initial setup looks all together:
2. Swapping Tokens
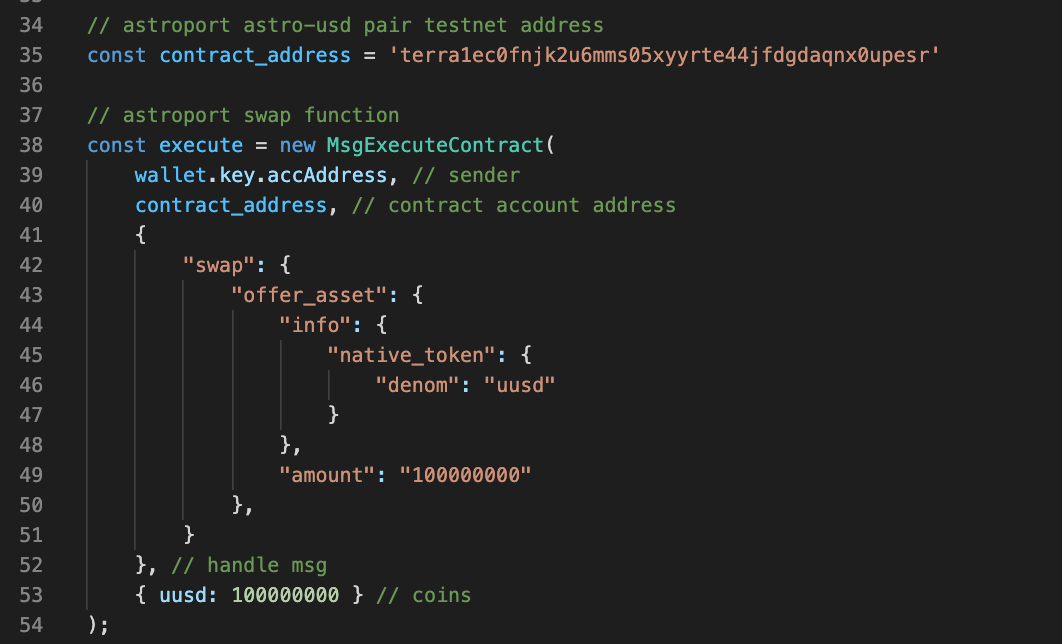
To swap tokens, you will need to send a “swap” ExecuteMsg to the Astroport pair contract you want to swap between. For convenience, set up a contract_addressvariable with the address of the Astroport pair contract. This tutorial uses the UST-ASTRO testnet address. For a full list of Astroport-related addresses, look here.

Swapping native tokens
The swap operation takes in an offer_asset, either a native denomination (denom) or a CW20 contract_addr. For this tutorial, we will use the ASTRO-UST pool and pair contract to swap UST for ASTRO. Since we’re swapping a native token, we will need to input the coin and amount as the fourth parameter to our MsgExecuteContract call.
To complete the call, you need to create an async function that creates and signs the transaction with your wallet. The “msgs” parameter takes in the “execute” variable created above which contains the “contract_address” and ExecuteMsg to call.
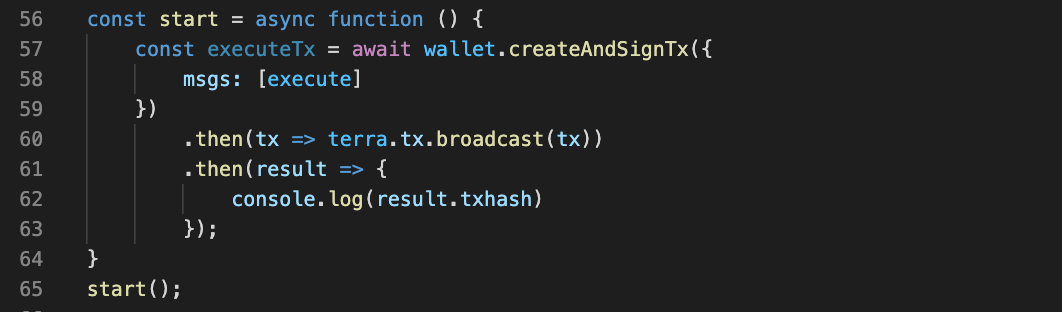
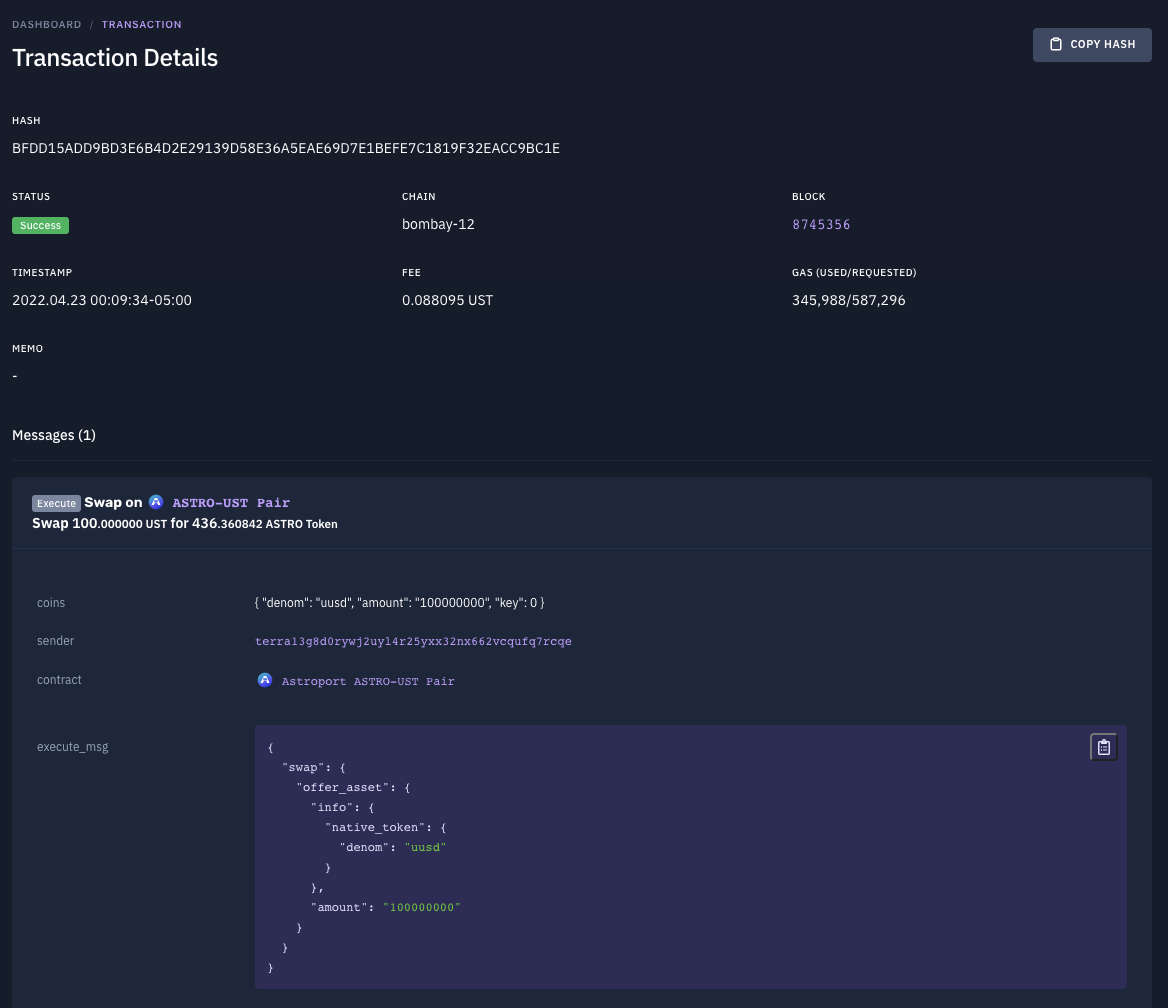
To execute this call, we use the terminal and node.js to return the transaction hash.
Returns:

Congrats! You’ve swapped a native Terra asset. We can use the transaction hash that’s returned to get more information about our transaction using a Terra explorer like terrasco.pe
Swapping CW20 tokens
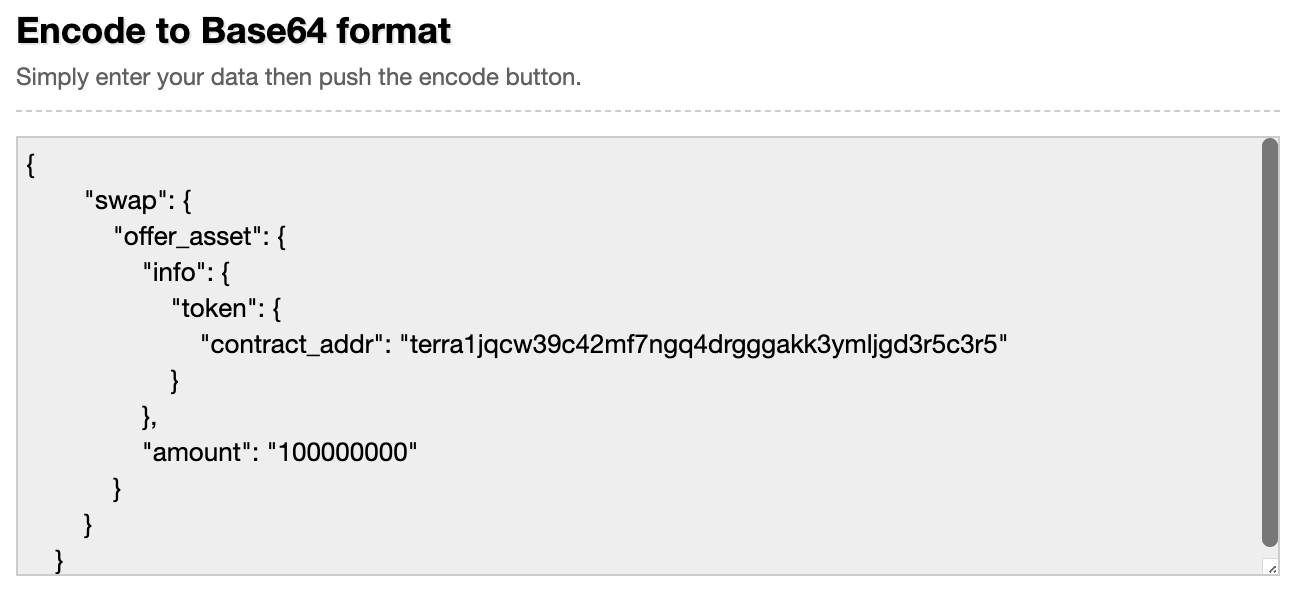
To swap CW20 tokens, you will need to encode the swap operation on the pair contract you want to swap between in a Base64 encoding and call the sendoperation on the token contract address for the token you are swapping with this encoding embedded.
The swap operation takes in an offer_asset, either a native denomination (denom) or a CW20 contract_addr. For this tutorial, we will use the ASTRO-UST pool to swap ASTRO for UST. Since we’re swapping a CW20 token, we will need to encode the message in a Base64 encoding.
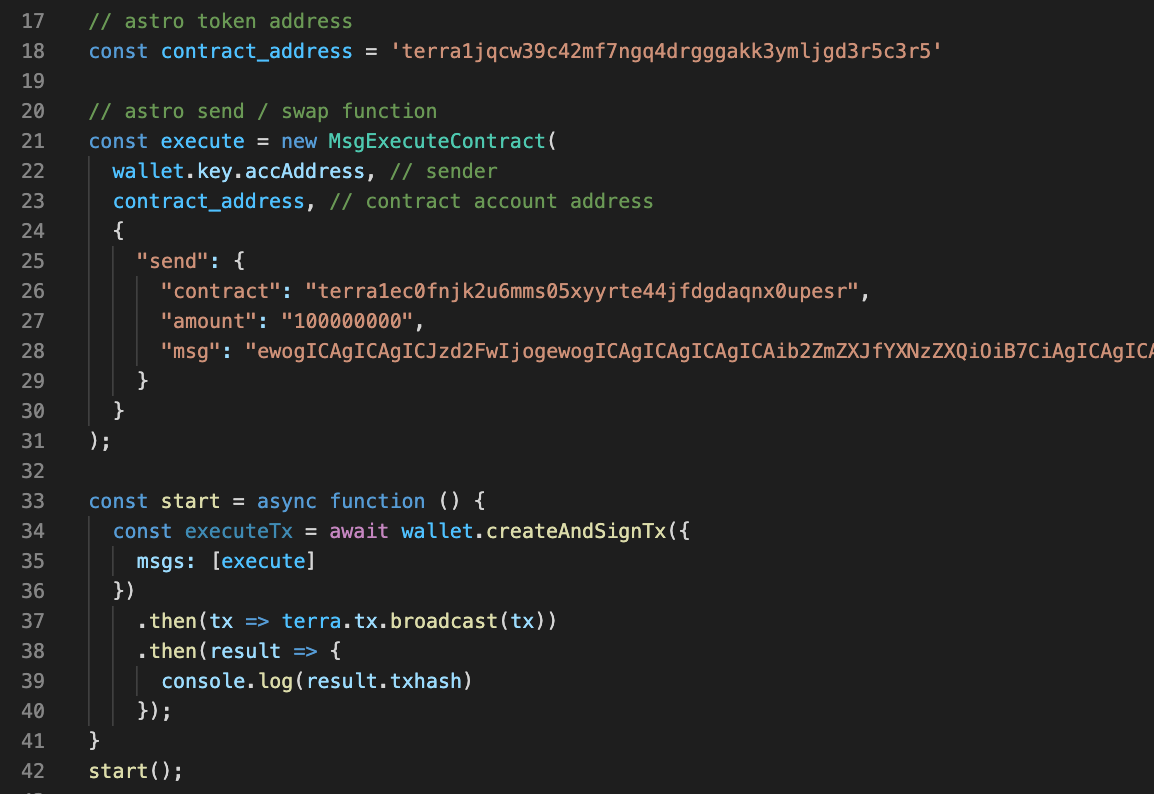
Once you’ve encoded the swap operation, you will need to call the sendoperation on the respective CW20 token address to send tokens to the contract in question. For this example, we will be changing our contract_address variable to the testnet ASTRO contract address.
The send operation takes in a contract, in our case the ASTRO-UST pair address receiving our tokens, the amount of CW20 tokens to send, and a msg with a Base64 encoding that describes the swap operation to execute on the contract.
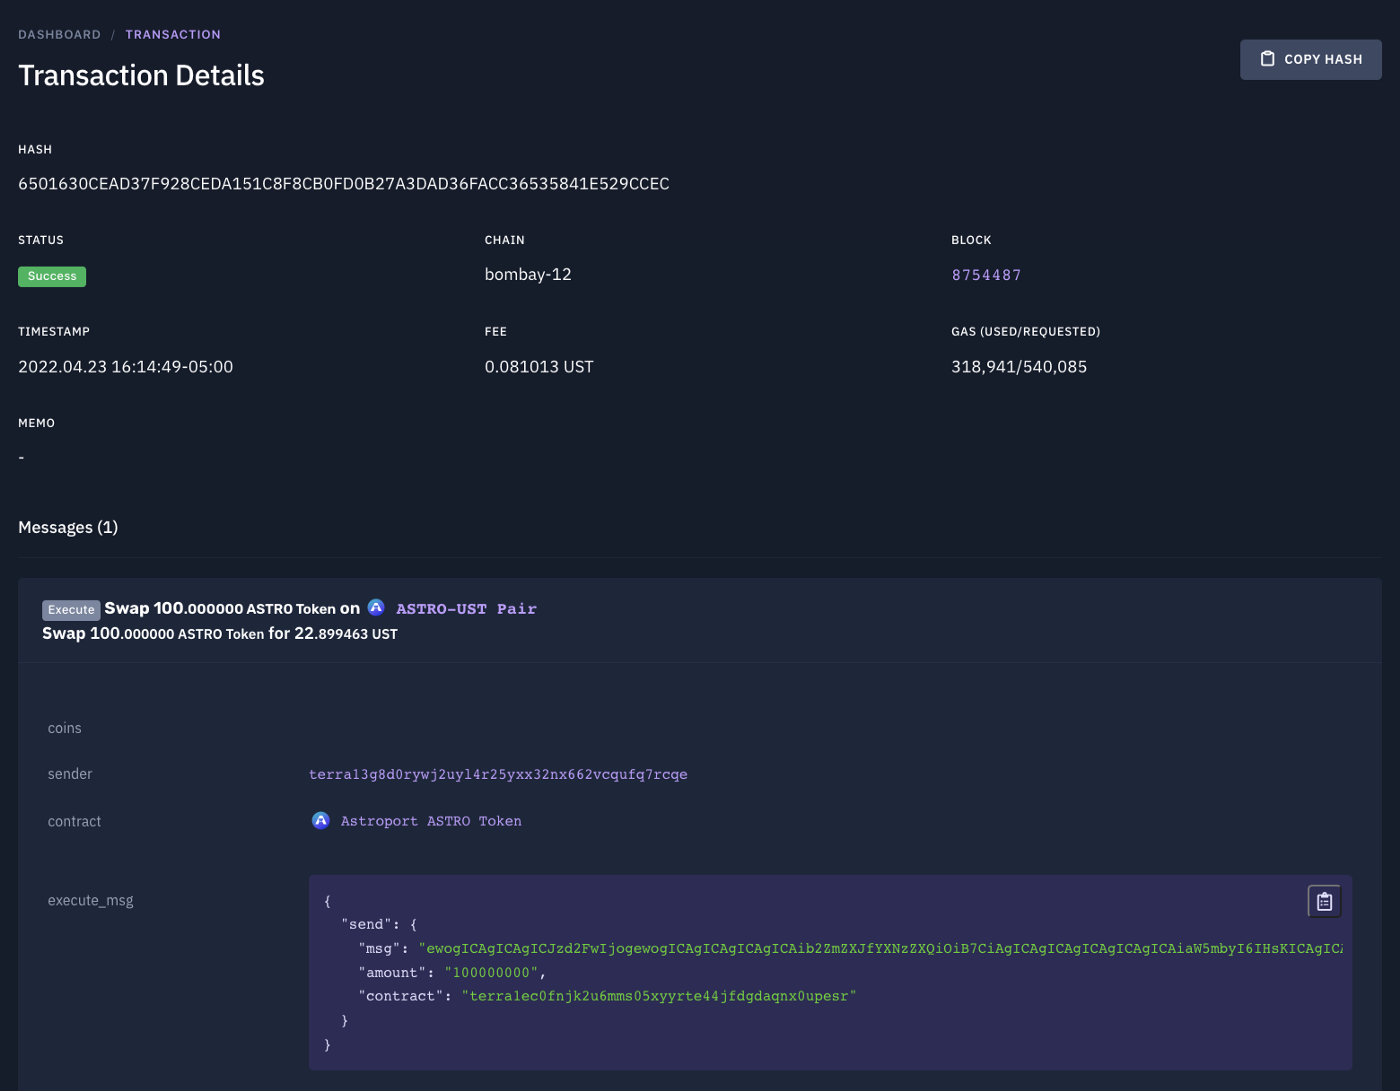
To execute this call, we use the terminal and node.js to return the transaction hash.
Returns:

Congrats! You’ve swapped a CW20 asset by calling the swap function indirectly through a cw20 send operation. We can use the transaction hash that’s returned to get more information about our transaction using a Terra explorer like terrasco.pe
Optional parameters
We can also specify optional parameters when swapping assets in the above two tutorials.
To include additional parameters, the updated MsgExecuteContract call is similar to our previous tutorials in this section, except it also specifies a belief_price, max_spread, and/or the receiver address (can be different from the sender).
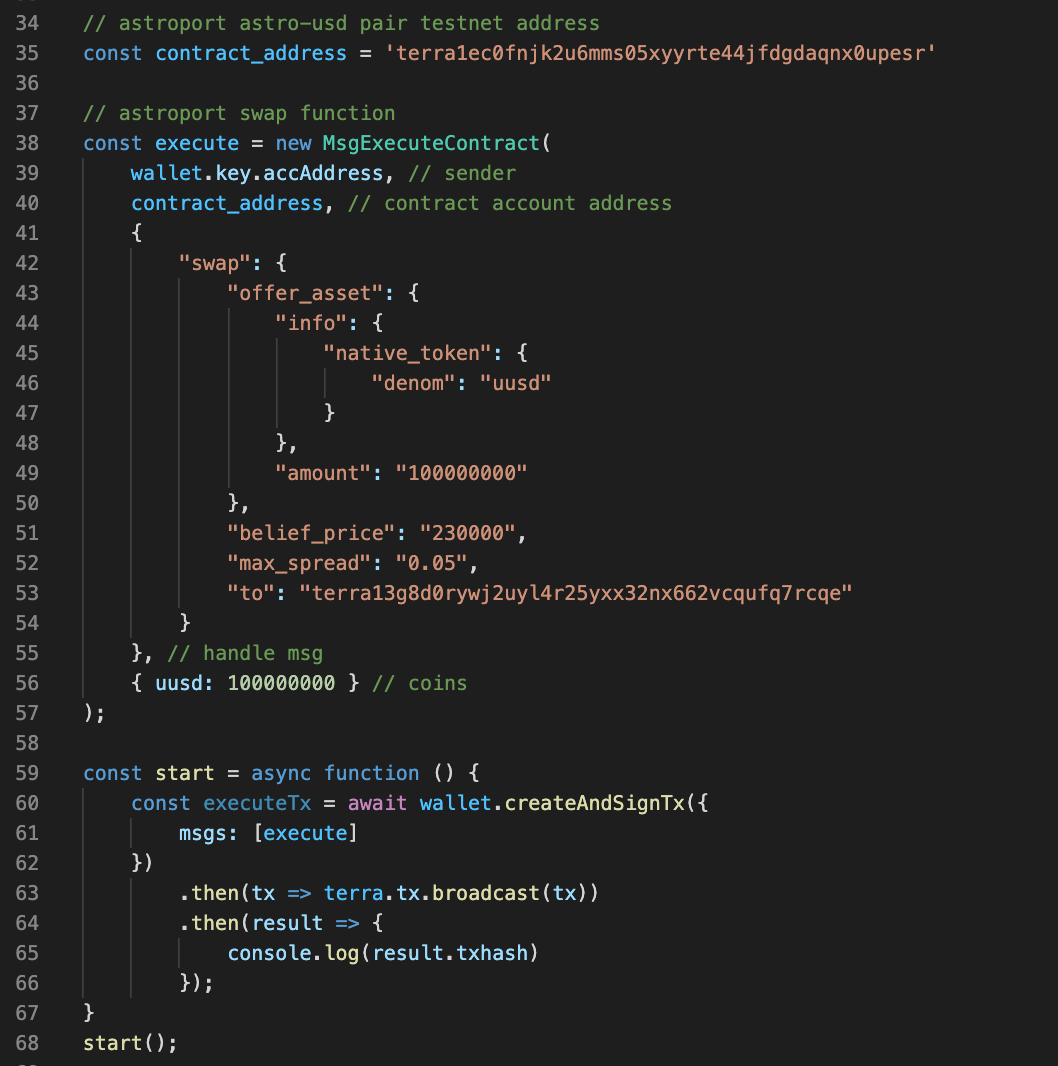
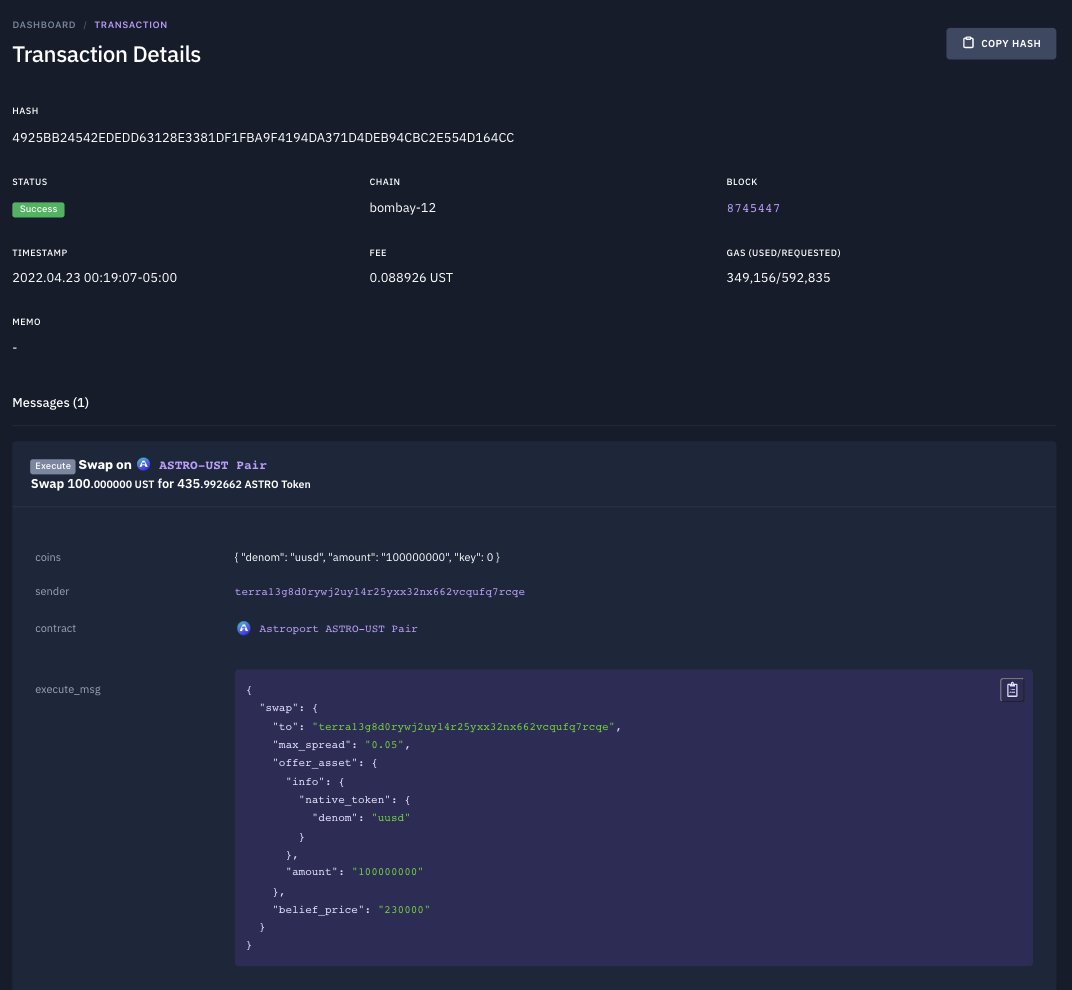
To execute this call, we use the terminal and node.js to return the transaction hash.
Returns:

Congrats! You’ve swapped assets by specifying additional parameters. We can use the transaction hash that’s returned to get more information about our transaction using a Terra explorer like terrasco.pe
3. Multihop Swapping
Multihop swapping native tokens
In some cases, you may need to swap between two tokens that don’t share a liquidity pool or that share a pool with little liquidity. For these cases, you may have to perform a multihop swap between a matching asset. For example, LUNA-UST and ASTRO-UST pools allow you to multi-hop swap between LUNA and ASTRO.
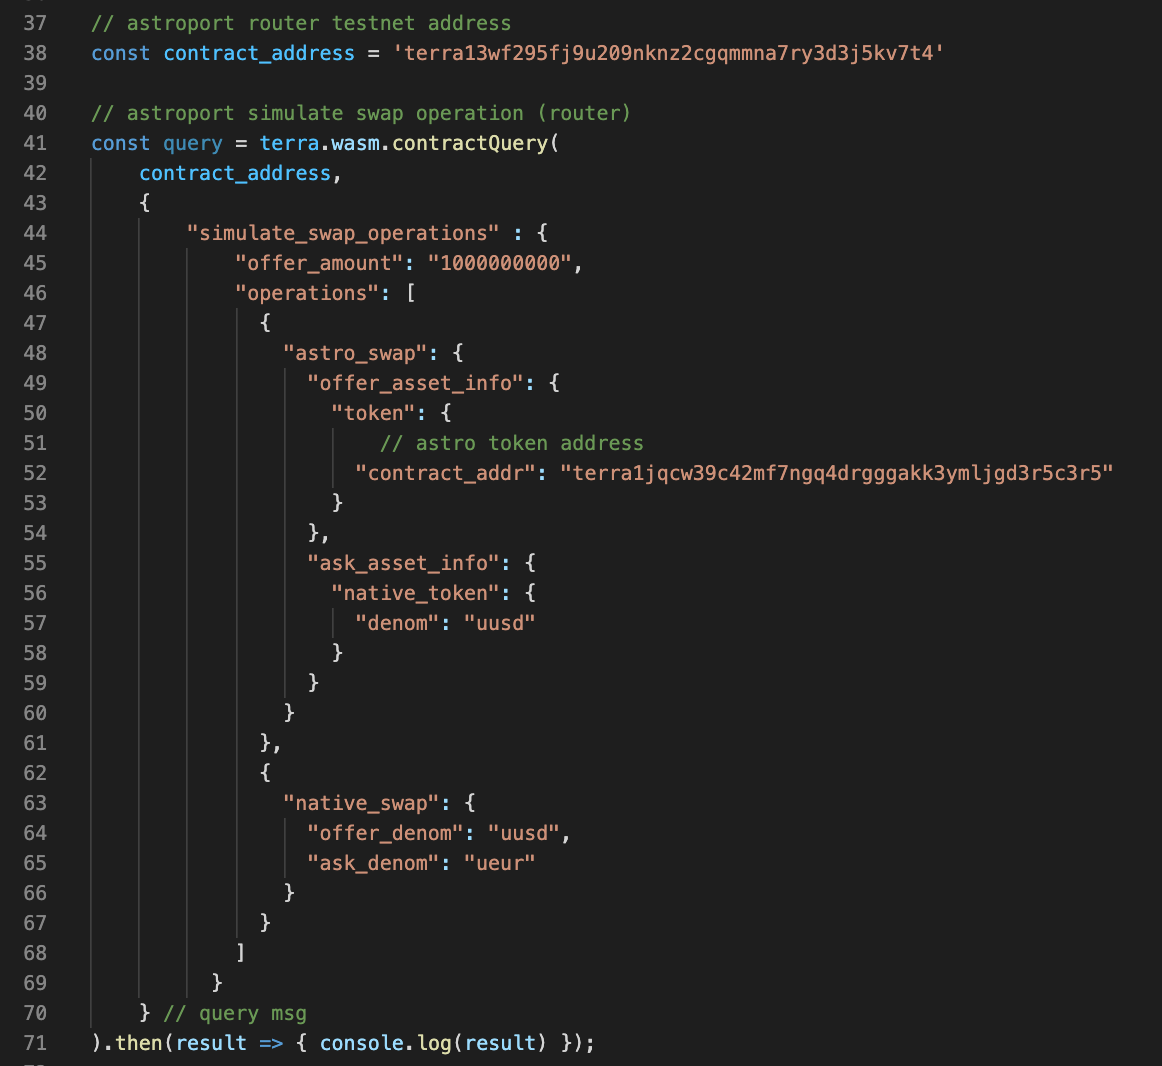
Before you execute a multihop swap operation, you can call the simulate_swap_operation query to the router contract to simulate the return balance for your multi-hop swap. For this example, we will be performing a native swap (LUNA for UST) and the router will swap UST for ASTRO. Will will also change our contract_address variable to the testnet router contract address.
The function takes in an operations parameter that itself takes in either an astro_swap or native_swap. Each of these swaps also has an offer and an ask asset of its own. Finally, we will also specify an offer_amount to simulate.
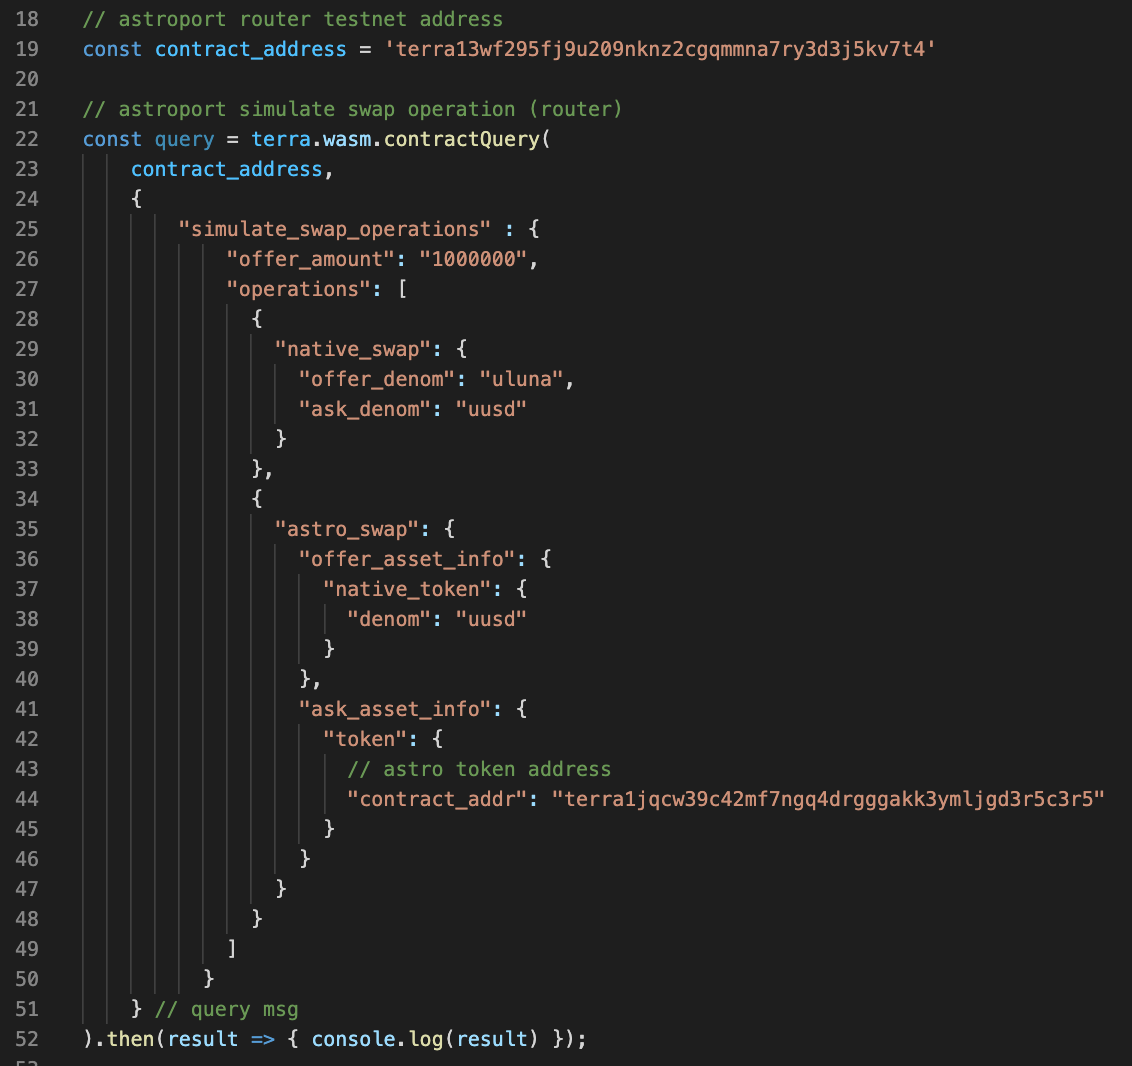
To execute the console.log request, we use the terminal and node.js to return the received amount for the simulated multihop swap.
Returns:

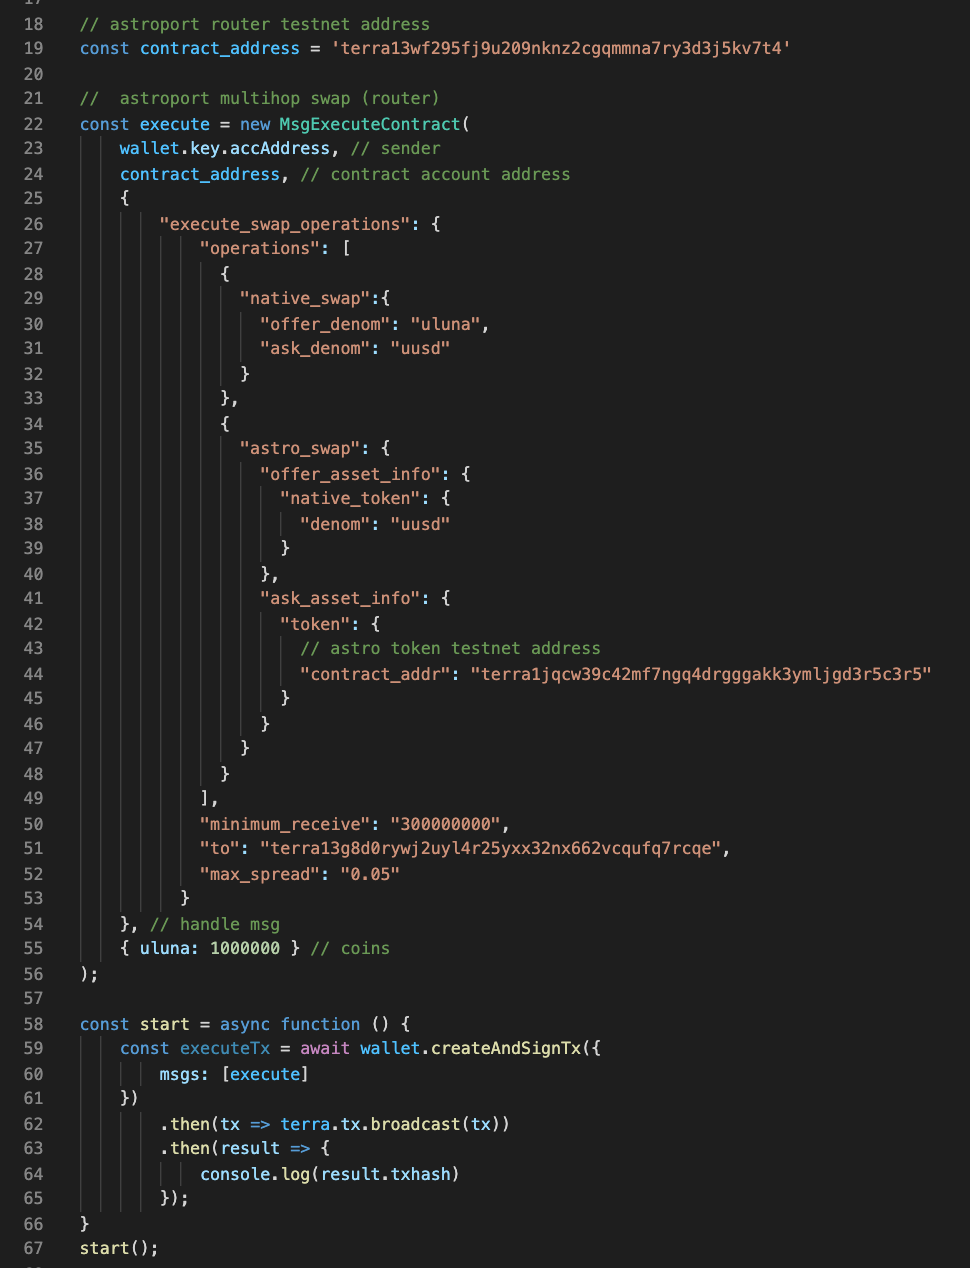
Now that we know the return amount to expect from a multihop swap, we are ready to call the execute_swap_operations function on the router contract.
Similar to the simulation query, the execute function takes in an operationsparameter that itself takes in either an astro_swap or native_swap. Each of these swaps also has an offer and an ask asset of its own.
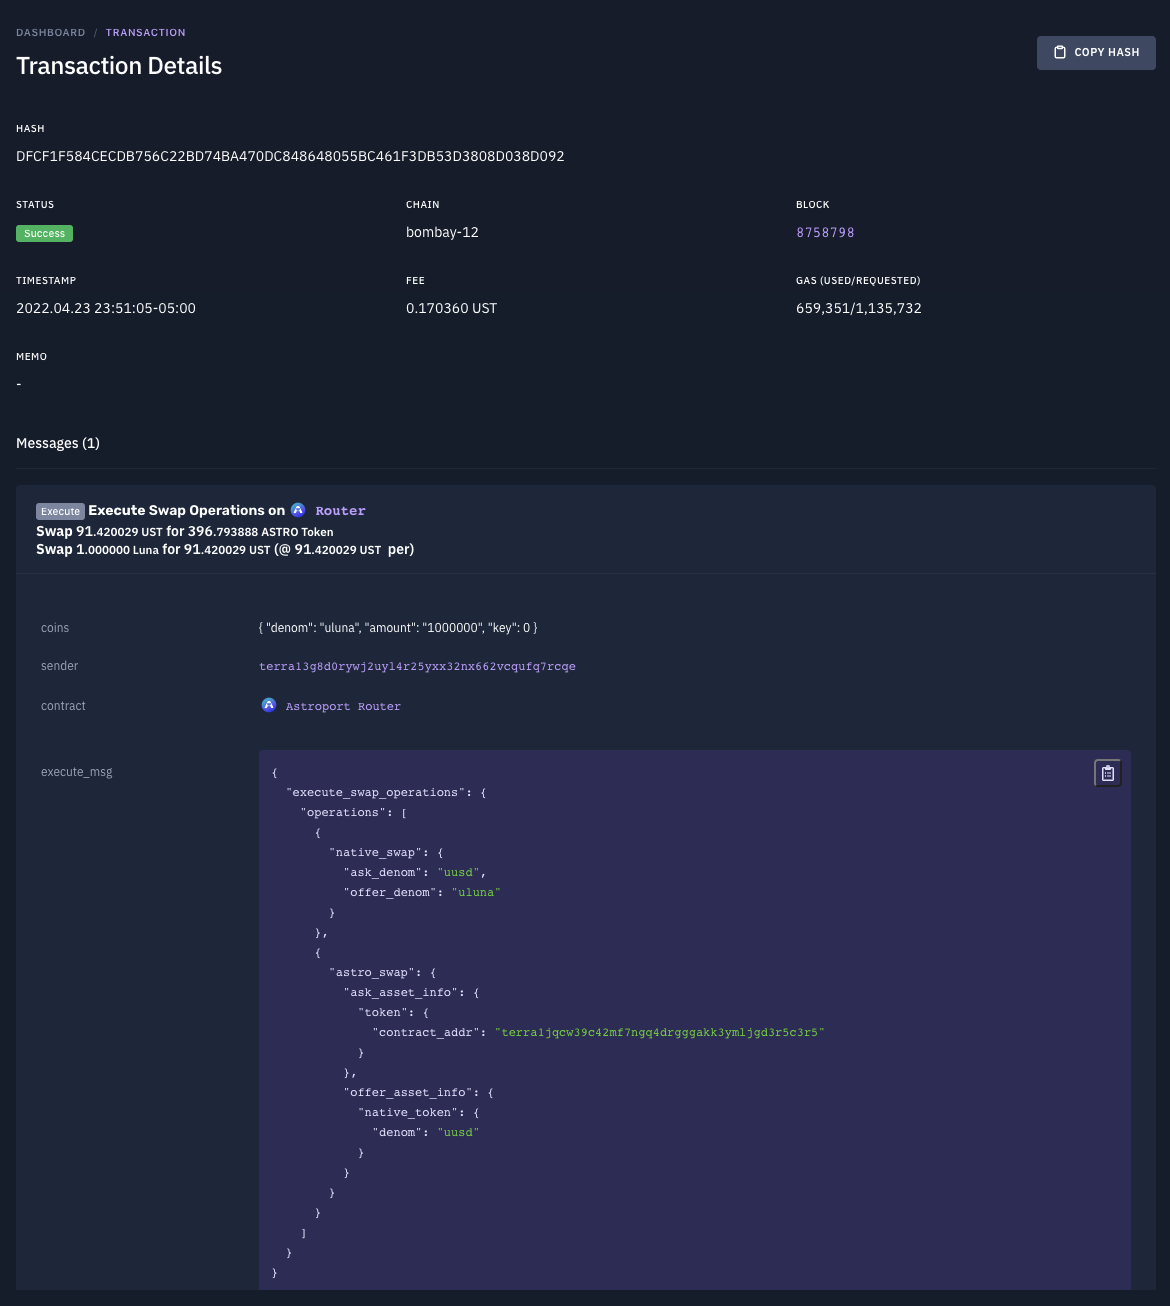
In our example, we are multi-hopping between LUNA and ASTRO by performing a native_swap between LUNA and UST and an astro_swap between UST and ASTRO. Since the initial offer asset is a native denomination (LUNA), we will input the denomination and amount as a fourth parameter to the MsgExecuteContract function to send our tokens (uluna) along with the transaction.
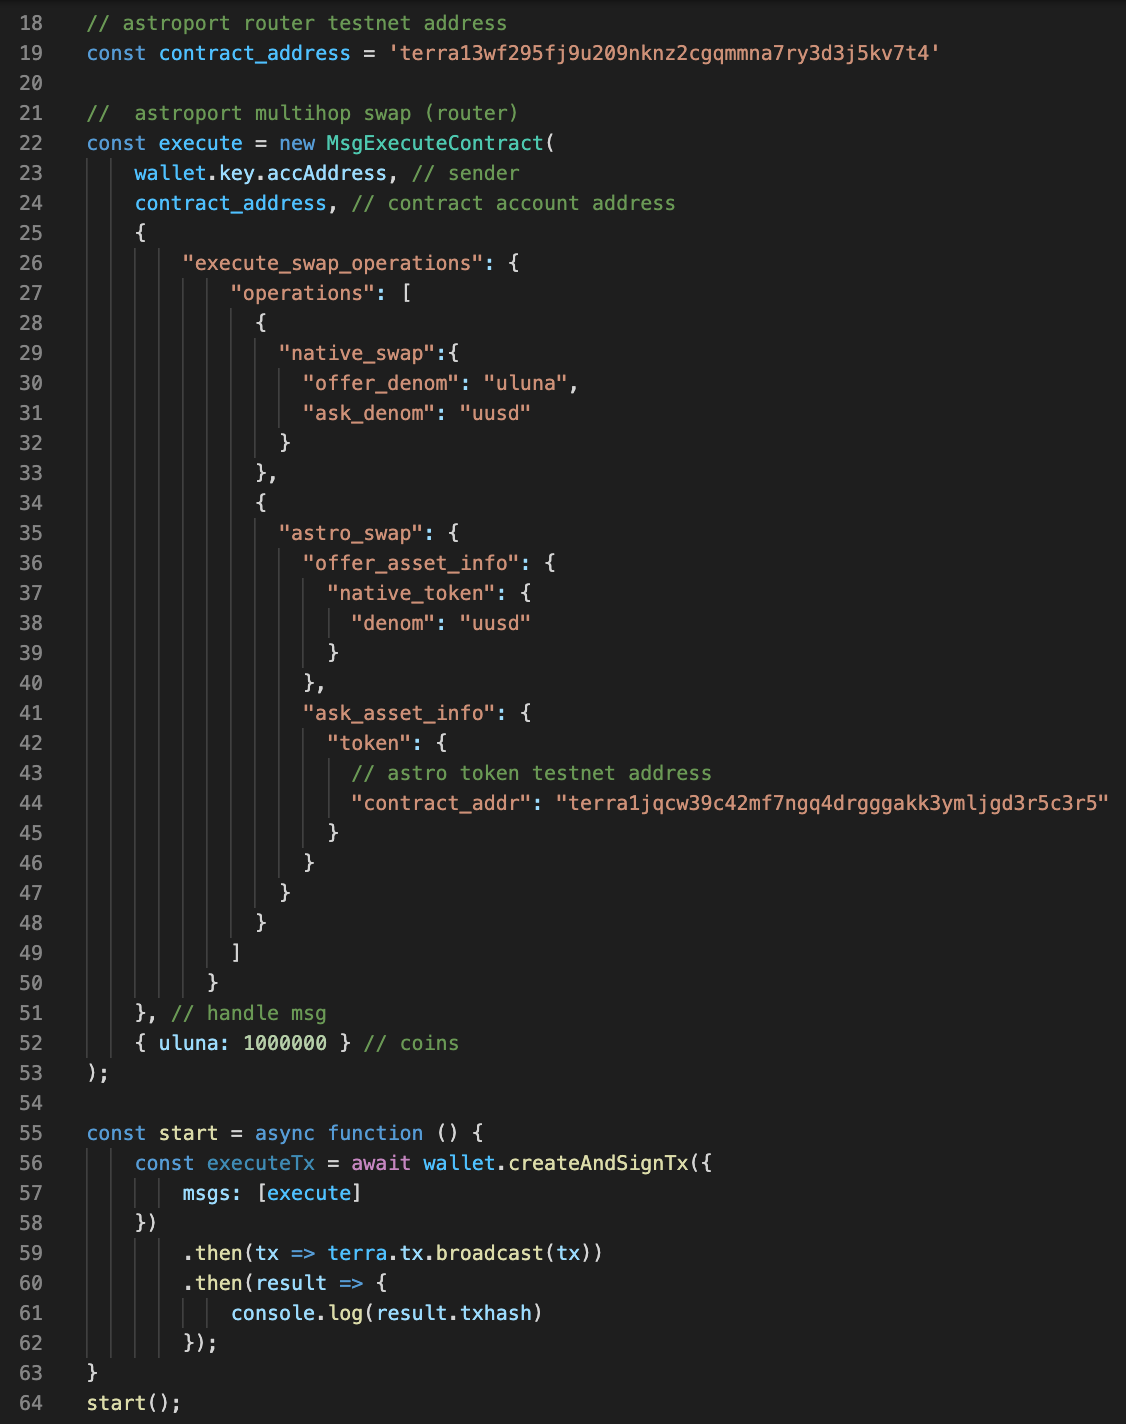
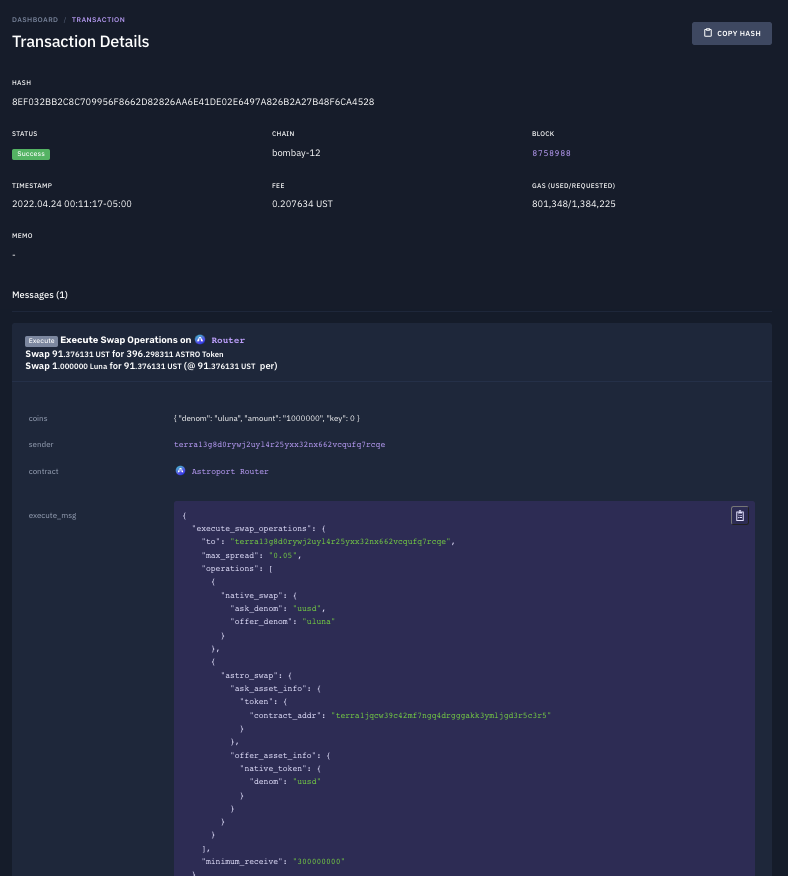
To execute this call, we use the terminal and node.js to return the transaction hash.
Returns:

Congrats! You’ve performed a multihop swap by calling the Router contract directly. We can use the transaction hash that’s returned to get more information about our transaction using a Terra explorer like terrasco.pe
Multihop swapping CW20 tokens
Before you execute a multihop swap operation, you can call the simulate_swap_operation query to the router contract to simulate the return balance for your multi-hop swap. For this example, we will be performing an “astro_swap” (ASTRO for UST) and the router will swap UST for EUT.
The function takes in an operations parameter that itself takes in either an astro_swap or native_swap. Each of these swaps also has an offer and an ask asset of its own. Finally, we will also specify an offer_amount to simulate.
To execute the console.log request, we use the terminal and node.js to return the received amount for the simulated multihop swap.
Returns:

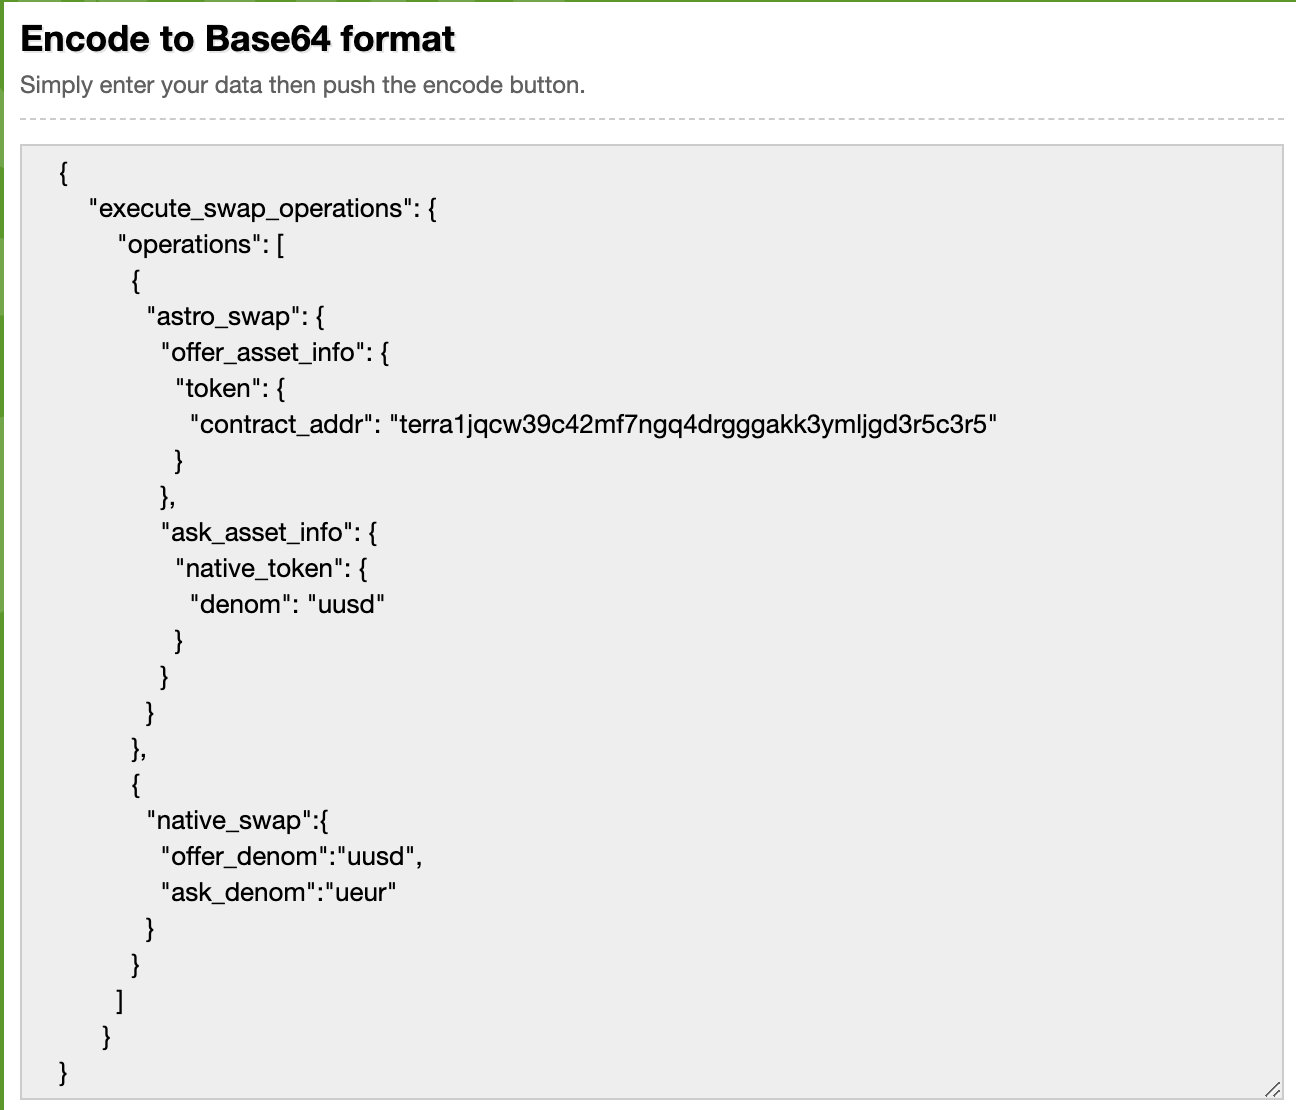
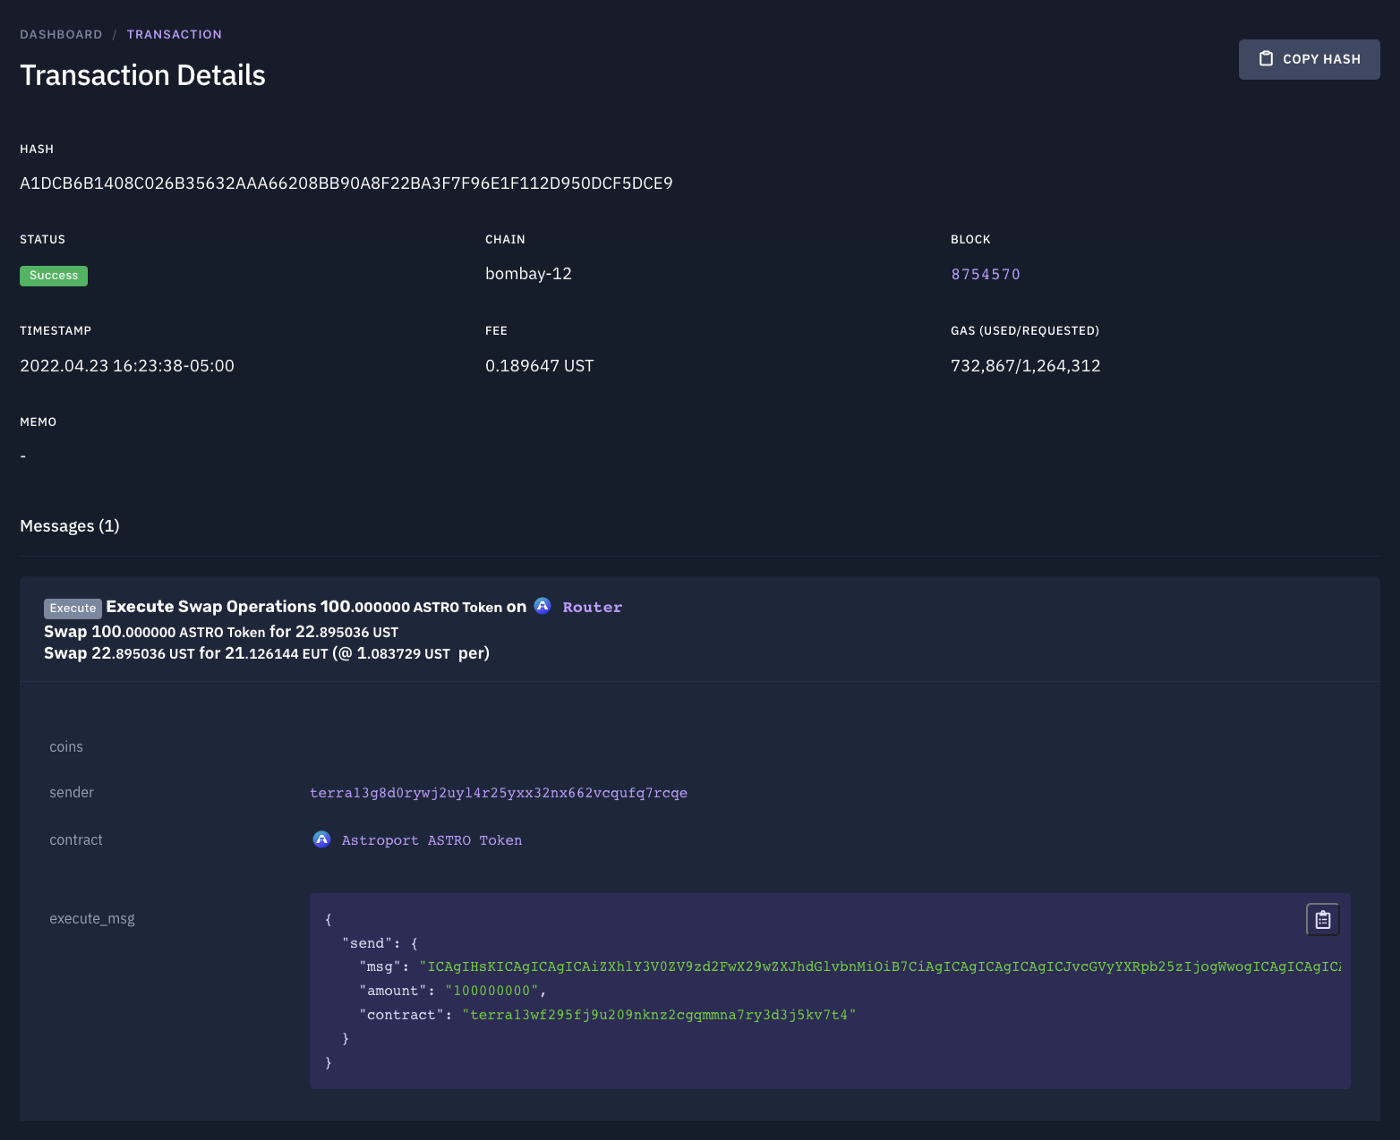
Now that we know the return amount to expect from a multihop swap, we are ready to call the execute_swap_operations function on the router contract. To perform a multihop swap with a CW20 token as the initial offer asset, you will need to encode the execute_swap_operation call on the router contract in a Base64 encoding and call the send operation on the token contract address for the token you are swapping with this encoding embedded.
For this tutorial, we will multi-hop swap between ASTRO and EUT. Since we’re swapping a CW20 token, we will need to encode the message in a Base64 encoding.
Once you’ve encoded the execute_swap_operations call, you will need to call the send operation on the respective CW20 token address to send tokens to the contract in question. For our example, we will be switching the contract_address variable to the testnet ASTRO token address.
The send operation takes in a contract, in our case the Router receiving our tokens, the amount of CW20 tokens to send, and a msg with a Base64 encoding that describes the execute_swap_operations call to execute on the contract.
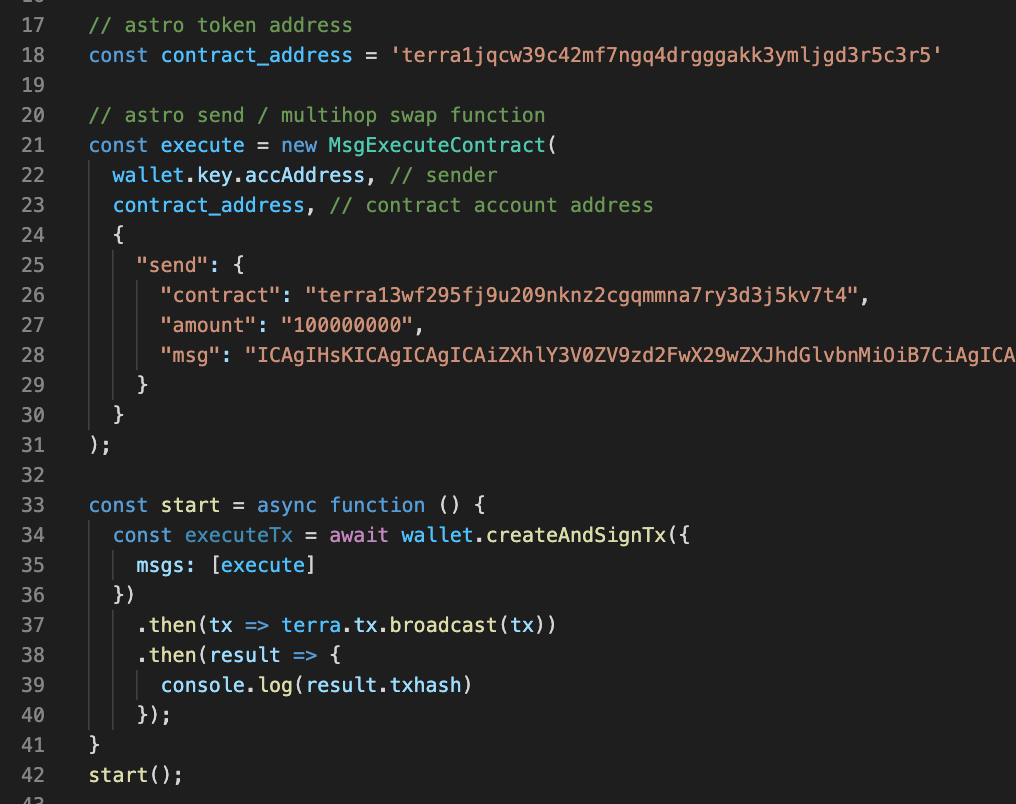
To execute this call, we use the terminal and node.js to return the transaction hash.
Returns:

Congrats! You’ve performed a multihop swap using a CW20 asset by calling the swap function indirectly through a CW20 send operation. We can use the transaction hash that’s returned to get more information about our transaction using a Terra explorer like terrasco.pe
Optional Parameters
We can also specify optional parameters when performing a multihop swap. Note that for swapping CW20 tokens as initial offer assets, optional parameters will have to be Base64 encoded with the rest of the call. Visit the previous tutorial on multihop swapping CW20 tokens for more information.
The updated MsgExecuteContract call is similar to our previous tutorials in this section, except it also specifies a minimum_received which you can estimate from simulating the swap (refer to the previous tutorials in this section), the max_spread for the swap, and the receiver address (can be different from the sender).
To execute this call, we use the terminal and node.js to return the transaction hash.
Returns:

Congrats! You’ve performed a multihop swap by specifying additional parameters. We can use the transaction hash that’s returned to get more information about our transaction using a Terra explorer like terrasco.pe
Congrats! You’ve completed all of the tutorials!
For more information regarding Astroport smart contracts, visit the Astroport docs.
✦
Follow Astroport on Twitter and subscribe to the Astroport email newsletter to get the latest alerts from the mothership.
DISCLAIMER
Any mention of third-party protocols is not an endorsement. As always, DYOR. This article does not constitute investment advice. Before interacting with Astroport, review the project disclaimers here.