


This guide is intended for developers and more advanced users who want to interact with the Astroport Protocol directly. In the tutorials below, we will cover step-by-step walkthroughs for setting up Terra.js, creating Astroport pairs, and providing liquidity all through the command line.
1. Set up
Prerequisites
This tutorial uses the latest stable versions of node.js and node package manager. For more information on node.js, visit https://nodejs.org.
Installing Terra.js
Open up your terminal and change the directory to your Desktop or whichever root folder you wish to host your project on.
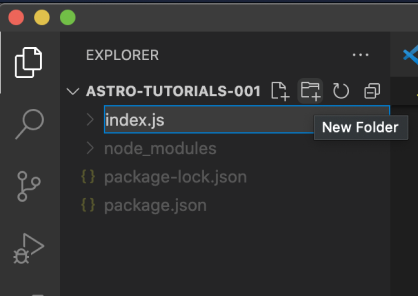
Make a new directory folder for your project and change the directory to your new folder.
Initialize a package.json file and node modules. You will be prompted to approve metadata for your project.
Install terra.js.
Export node options for async functions to execute properly with terra.js.
Getting started with Terra.js
Open up a code editor with your new folder and create an index.js file. Terra.js reads this as the root file which will be used to execute node commands in the terminal.
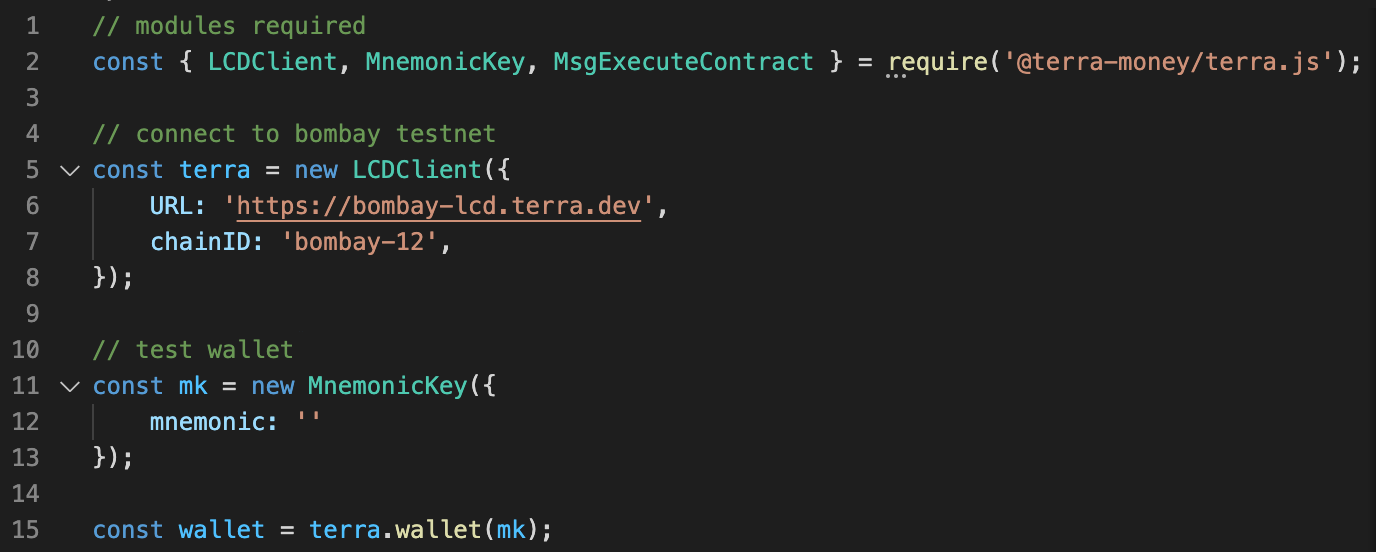
For this tutorial, you will need the following modules in your index.js file: LCDClient to connect to the Terra blockchain, MnemonicKey to sign and confirm transactions, and MsgExecuteContract to process and execute messages.
To get started, you will need to connect to the Terra blockchain. We will be using the bombay-12 testnet for now, but you can also use the mainnet or a localterra network. For more information, visit here.
After you’ve connected to the Terra blockchain, you will need to input a 24-word mnemonic key and set up a terra.wallet to sign and confirm transactions. Note that this is the quickest way to get started, but it does leave your private key exposed on your current file. For enhanced security, consider hosting your key on a separate file or other alternatives.
This is how the initial setup looks all together:
2. Creating a Pair
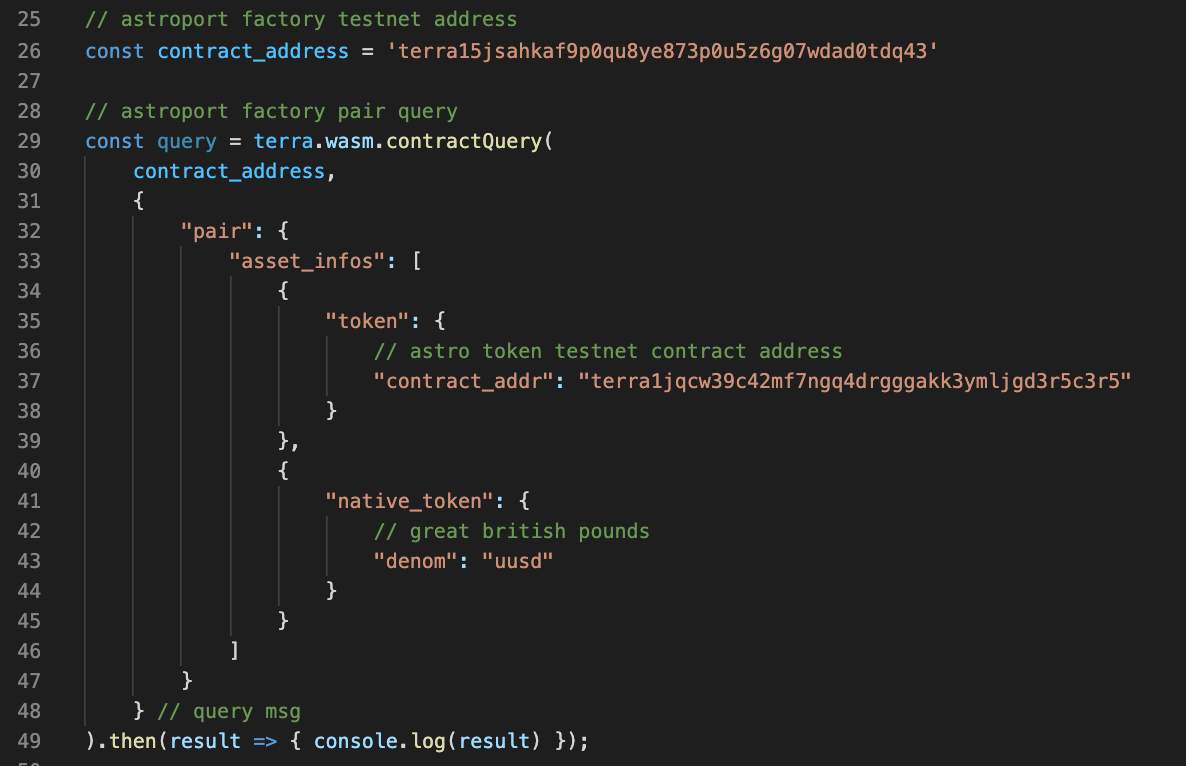
To create a pool, you will need to send a create_pair message to the factory contract. For convenience, set up a contract_address variable with the address of the contract you are currently working with (in this case, the Astroport factory contract). This tutorial uses the testnet address. For a full list of addresses, search here.
Constant product pools
When an address executes the create_pair operation, it creates an Astroport Pair contract and an associated Liquidity Token contract.
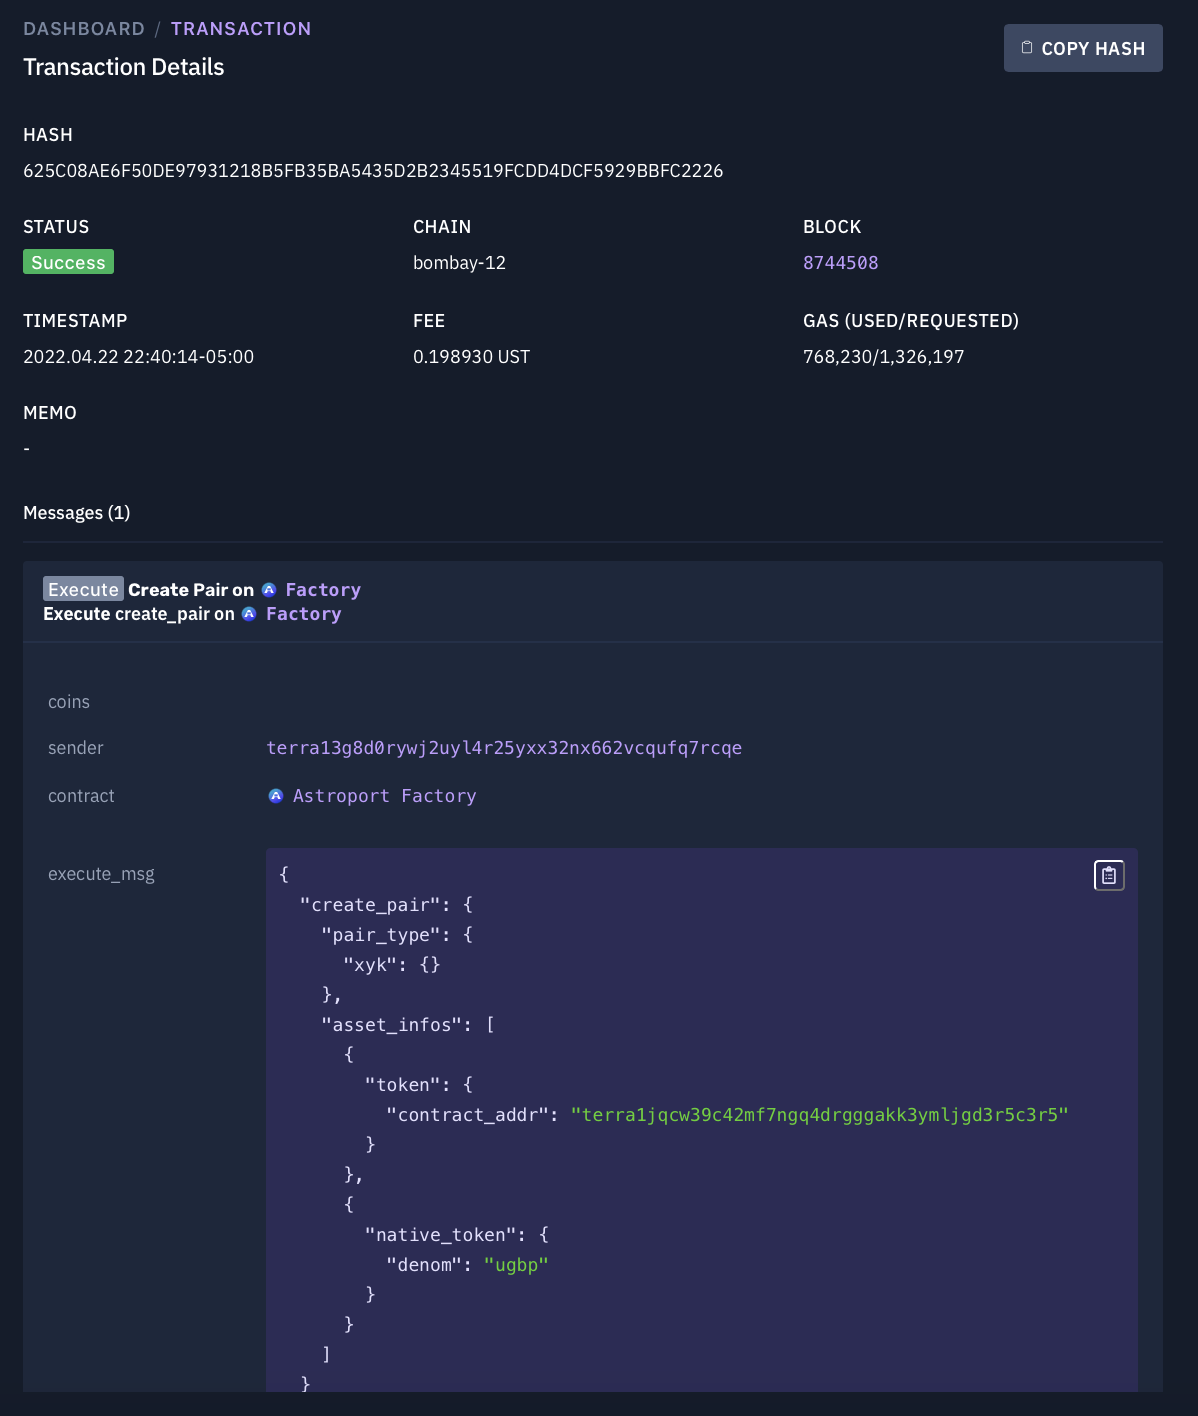
The create_pair operation takes in a pair_type and asset_infos for each of the two tokens in the pool. asset_infos can include either a CW20 contract_addr or a native_token denomination (denom). In this example, we are creating a constant product pool (xyk) composed of the ASTRO token and the native GBT coin (ASTRO-GBT pair).
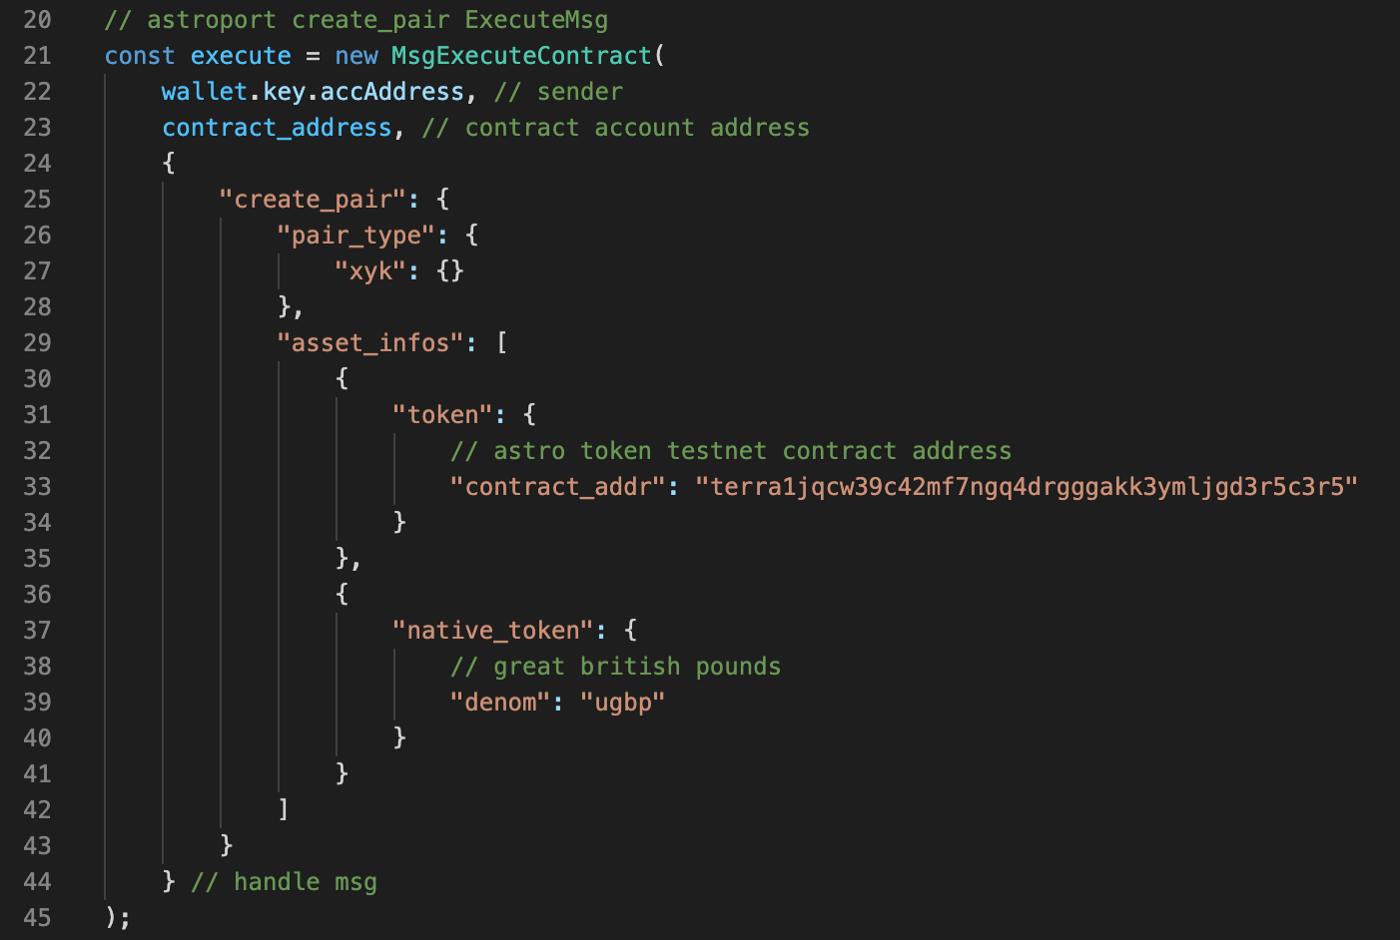
To complete the call, you need to create an async function that creates and signs the transaction with your wallet. The msgs parameter takes in the executevariable created above which contains the contract_address and ExecuteMsg to call.
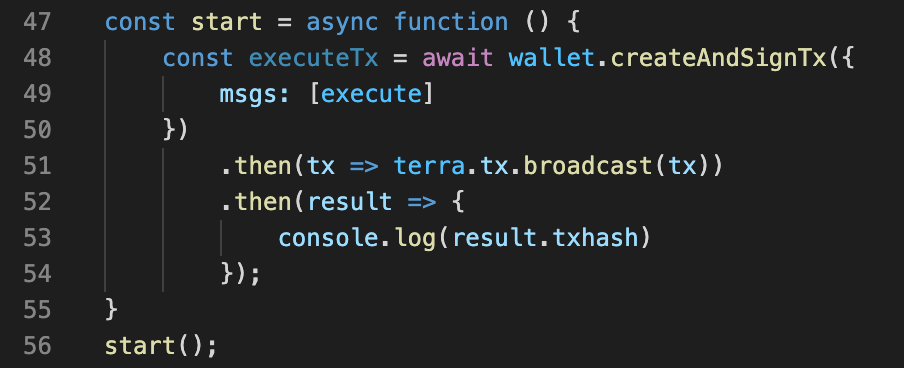
To execute this call, we use the terminal and node.js to return the transaction hash.
Returns:

Congrats! You’ve created a constant product pair by calling the factory contract directly. Note that you cannot create a new pair for an existing pair. We can use the transaction hash that’s returned to get more information about our transaction using a Terra explorer like terrasco.pe
Stableswap pools
To create a stableswap pool, an address can execute the create_pair operation and specify the pair_type parameter as stable. The create_pair function for stableswap pools is similar to the previous tutorial in this section. The notable difference is that stableswap pools require an additional init_params parameter which specifies a stableswap pool’s amplification. The parameter’s input, in this case the amp, must be wrapped in a Base64 encoding.
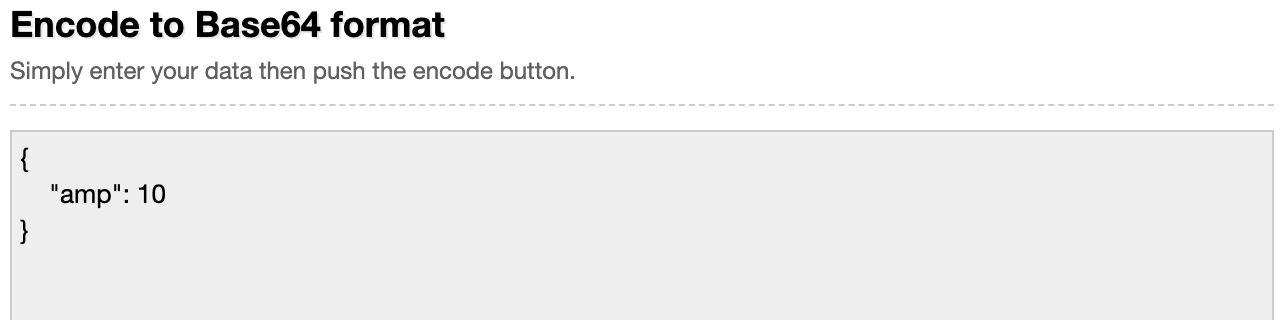
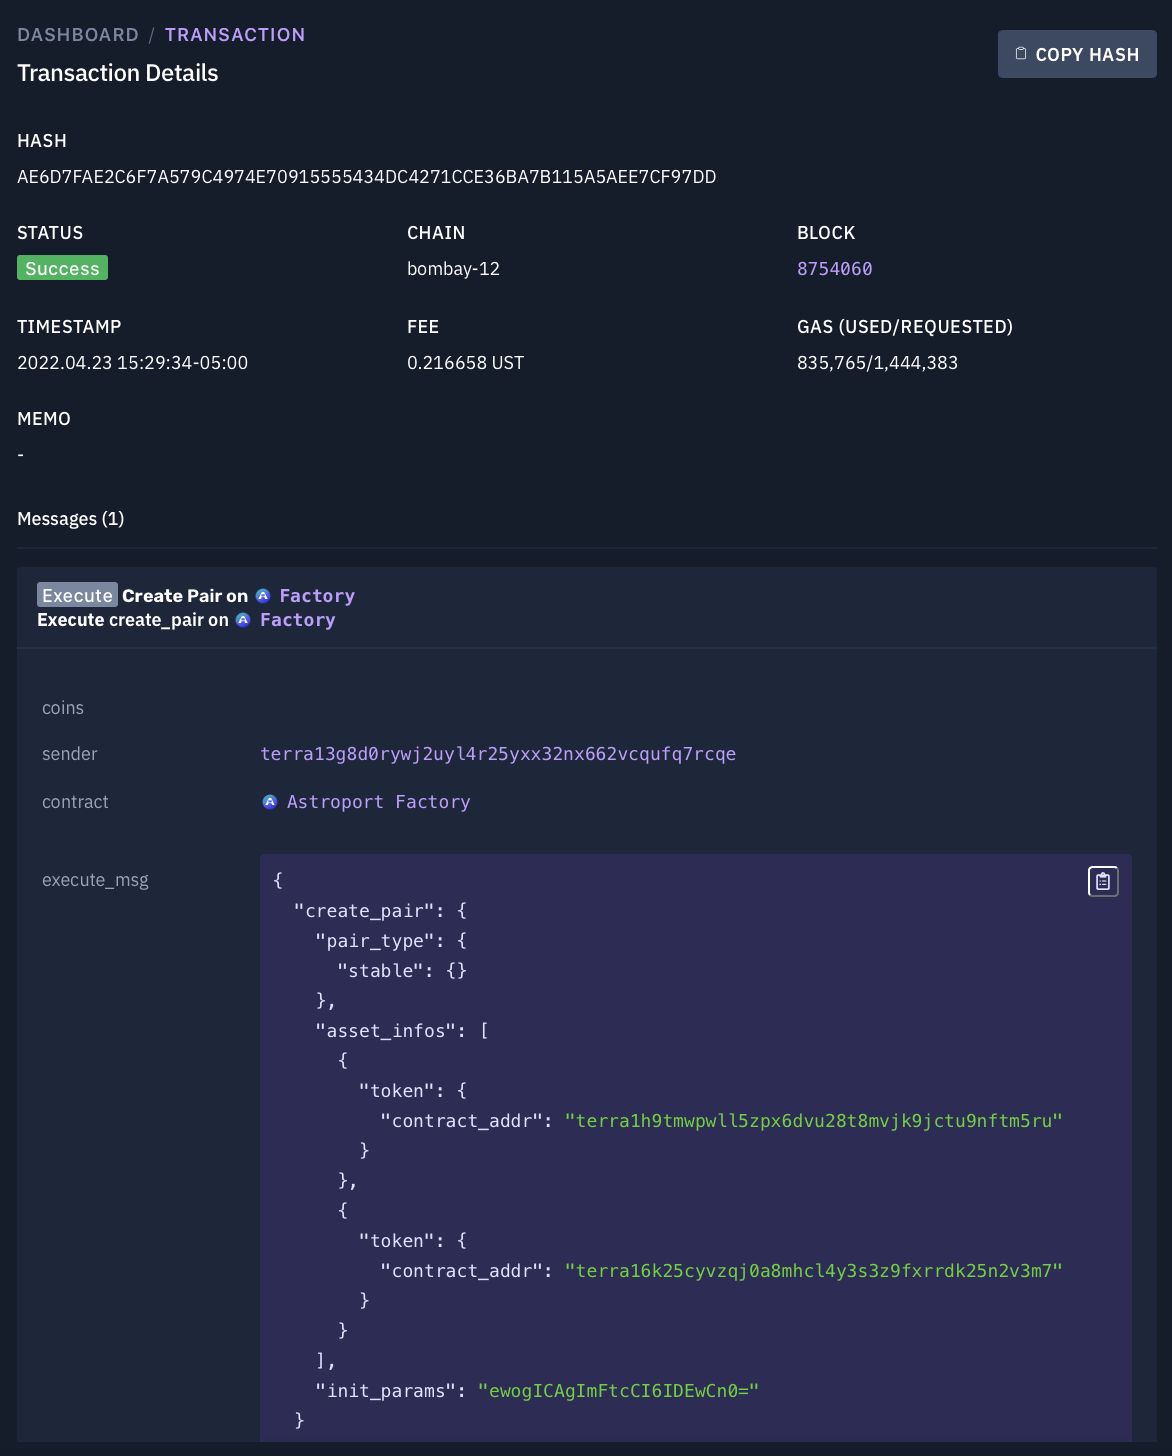
Once you’ve wrapped the amp parameter, you will need to insert the Base64 encoding as the input to the init_params parameter. The create_pair operation also takes in a pair_type and asset_infos for each of the two tokens in the pool. asset_infos can include either a CW20 contract_addr or a native_tokendenomination (denom). In this example, we are creating a stableswap pool (stable) composed of the MARS token and xMARS token (MARS-xMARS pair).
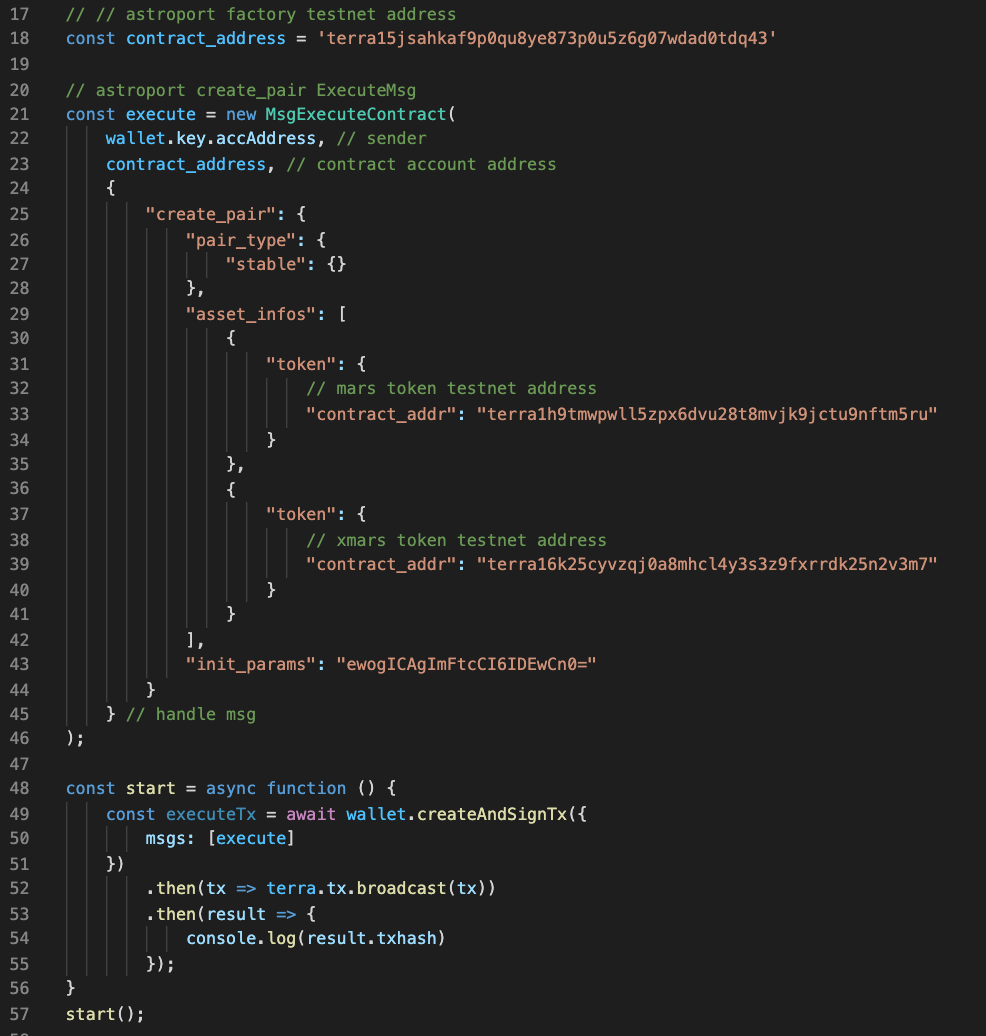
To execute this call, we use the terminal and node.js to return the transaction hash.
Returns:

Congrats! You’ve created a stableswap pair by specifying the amplification in a Base64 encoding and calling the factory contract directly. We can use the transaction hash that’s returned to get more information about our transaction using a Terra explorer like terrasco.pe
3. Providing Liquidity
Providing liquidity to a new pool
After creating a new pool, you need to provide it with liquidity so users can start swapping assets. As a liquidity provider, you will also gain fees from swaps.
Two steps you need to complete before you can provide liquidity: query for the contract address of the pair and increase your token allowance.
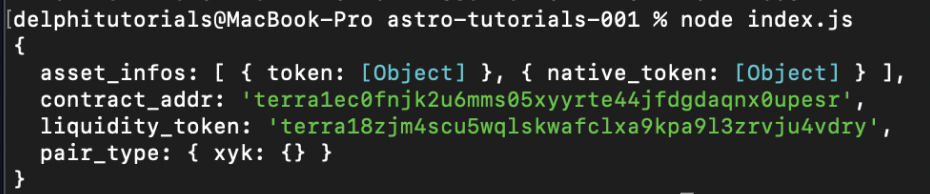
First, to query the token address of the pair, we call the pair query on the factory contract with our asset information. For this example, we are querying our recently created ASTRO-GBT pair which consists of both a CW20 token and a native asset.
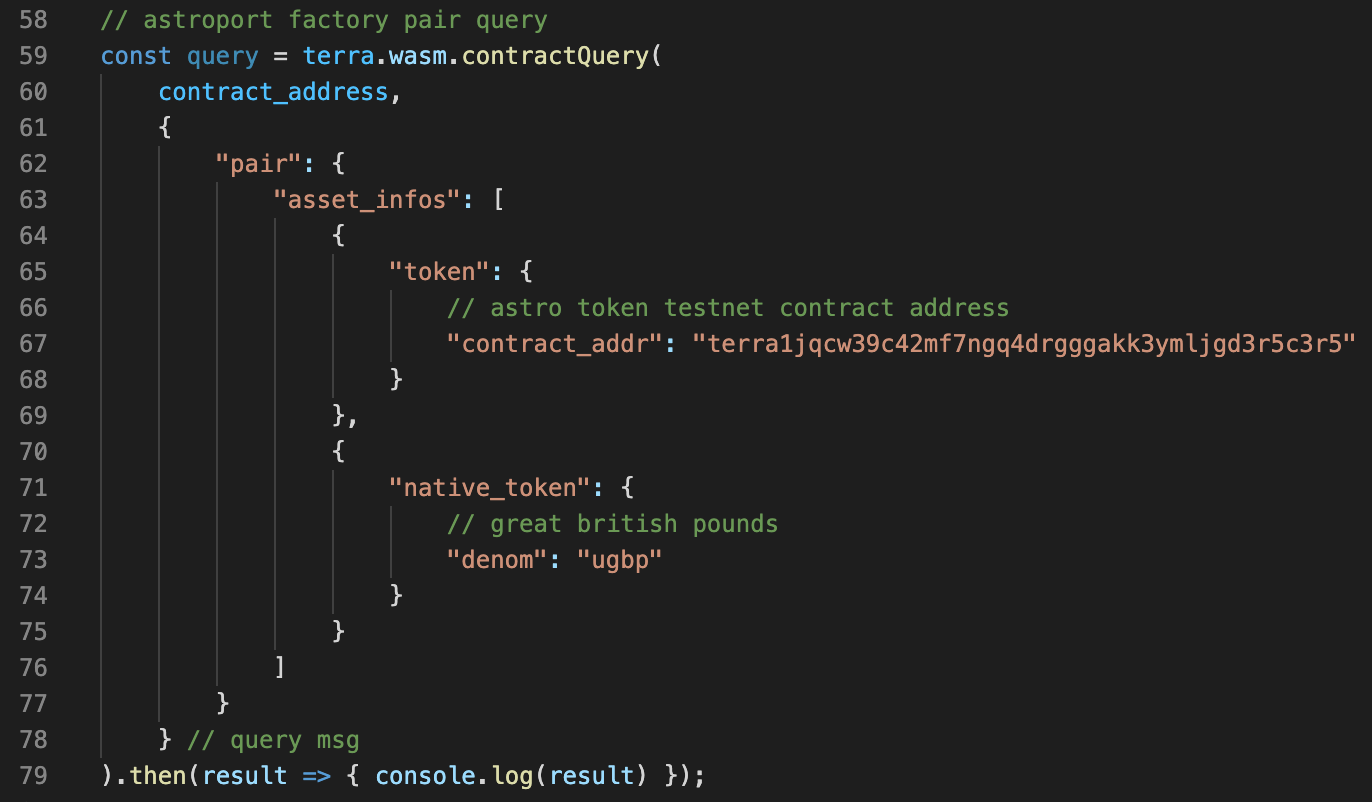
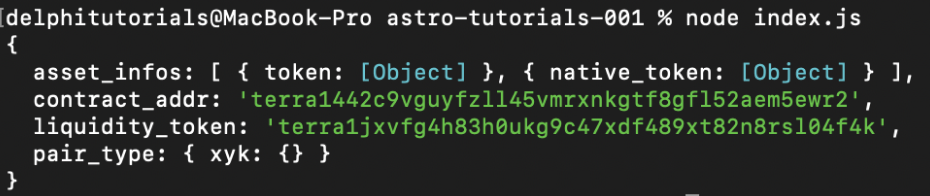
To execute the console.log request, we use the terminal and node.js to return the contract_addr for the pair as well as the liquidity_token address and the pair_type.
Returns:
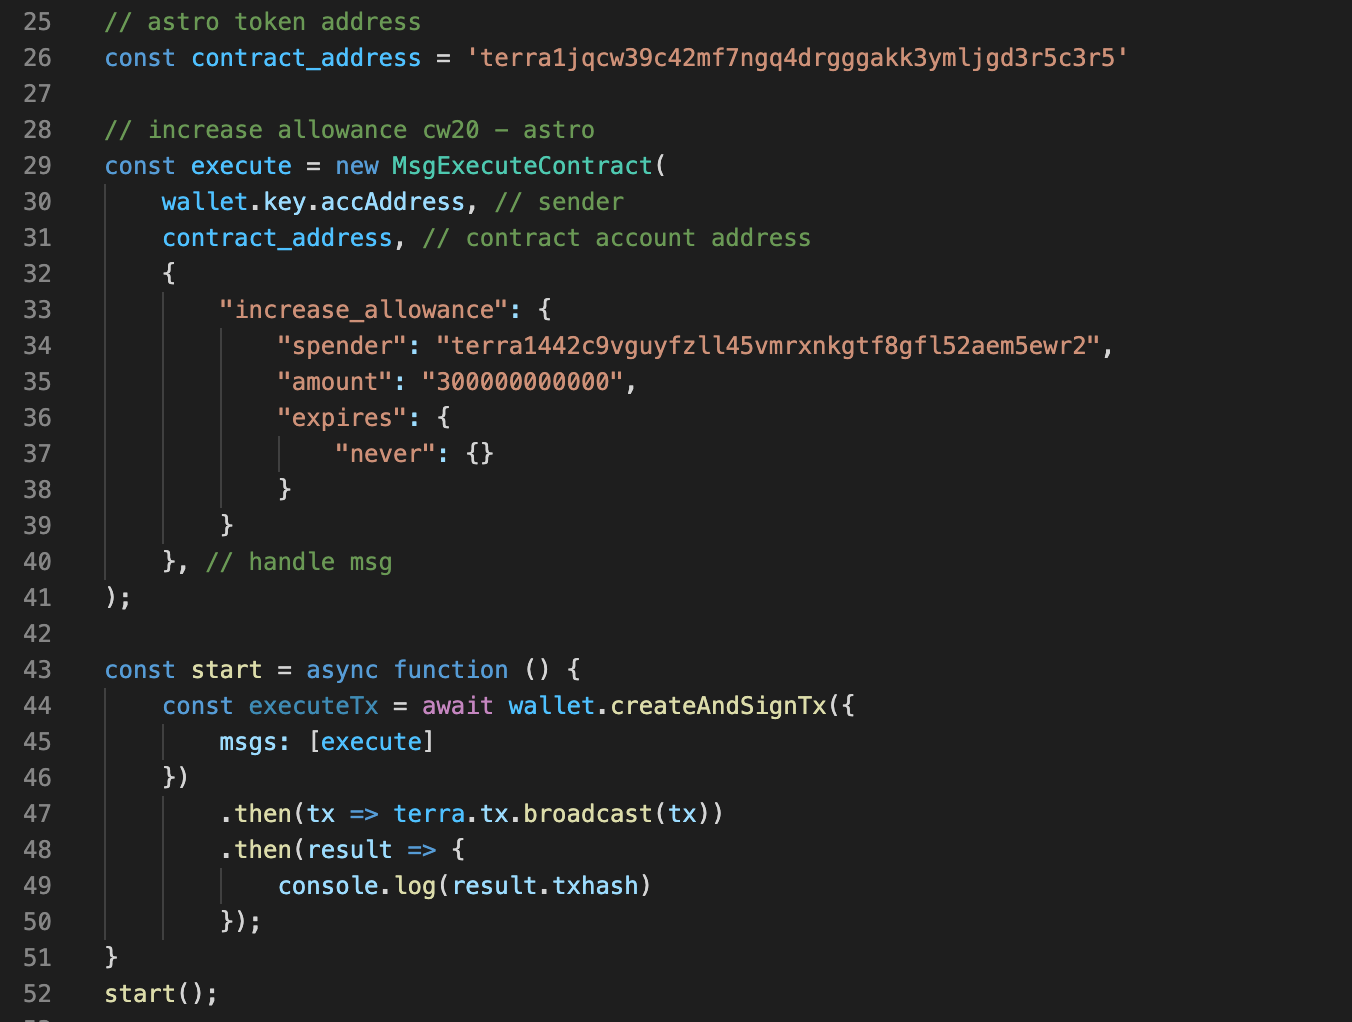
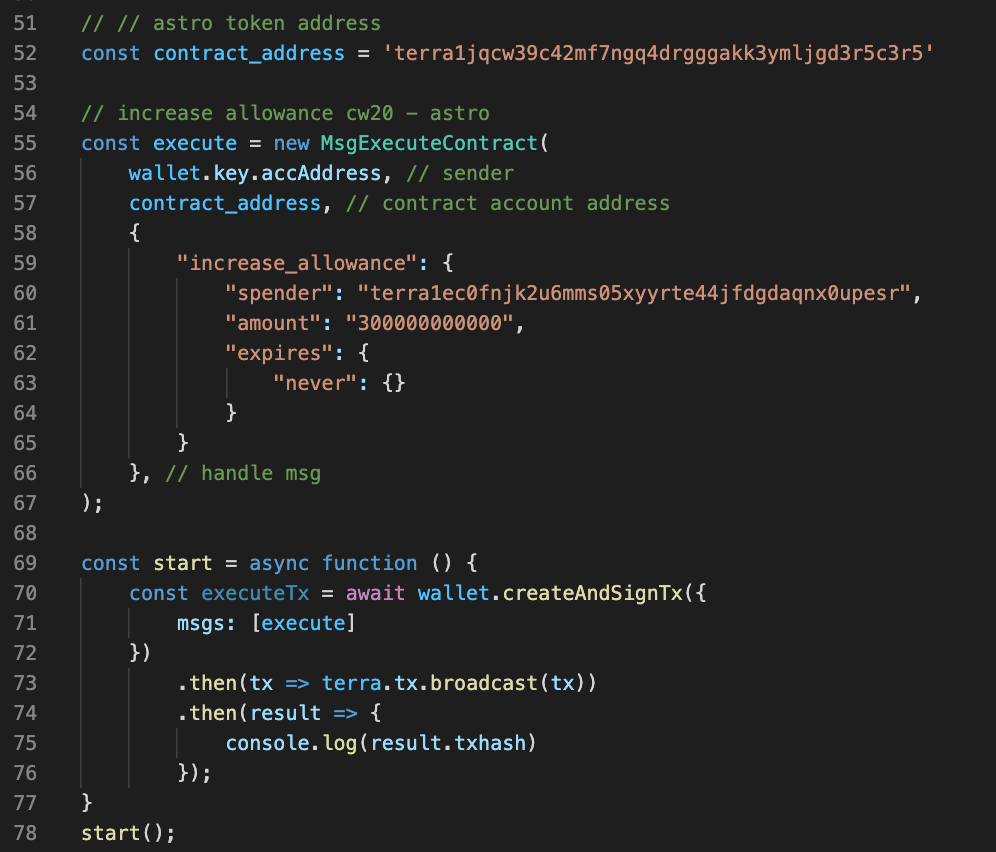
Next, we will need to approve the token allowance on any CW20 tokens we want to provide liquidity for. In this case, we will need to call the ASTRO token contract address. So far we’ve been working under the factory contract and will need to change our contract_address variable for our new message to execute.
The increase_allowance function on a give CW20 token takes in a spender, in our case, the ASTRO-GBT pair contract_addr that we just queried, as well as an amount and an expiration. For more information, visit here.
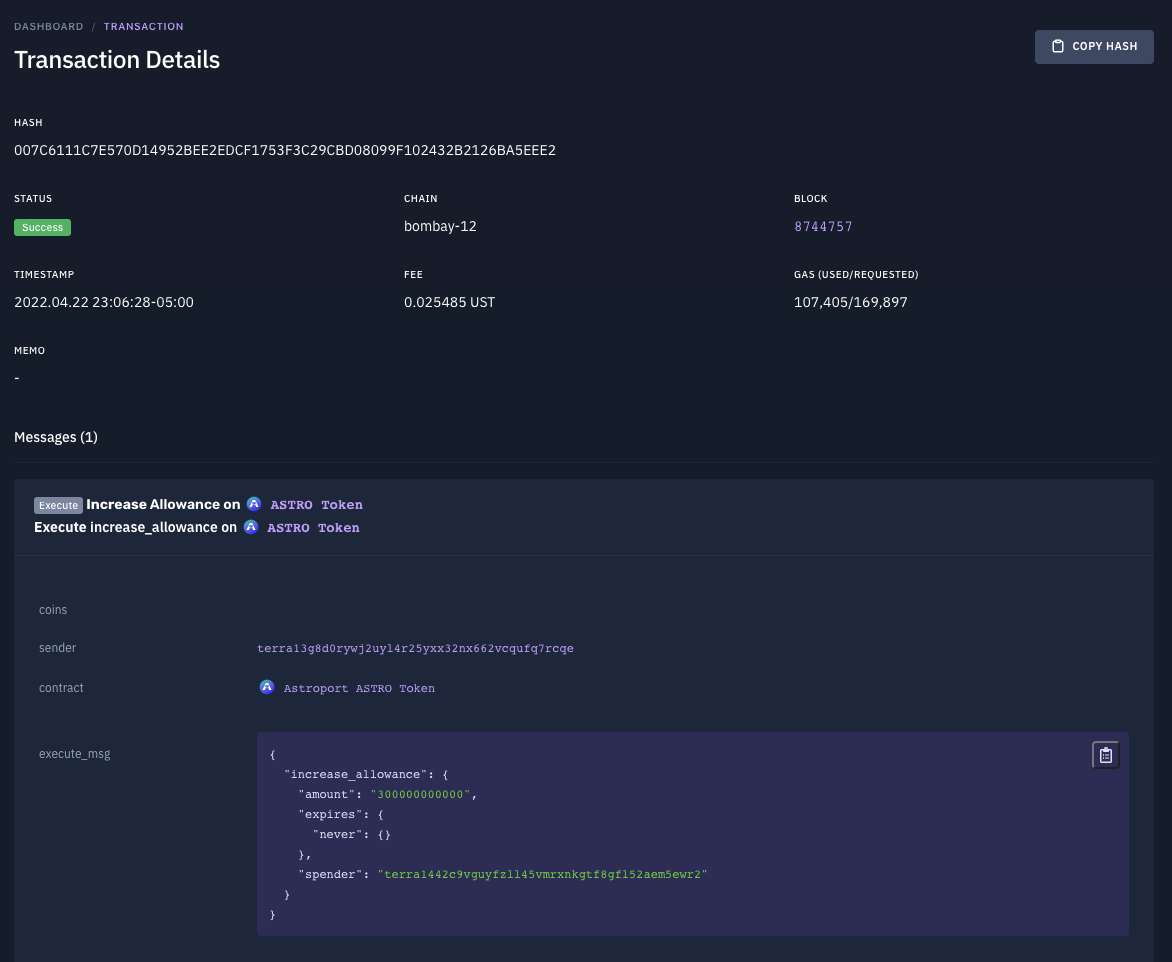
To execute this call, we use the terminal and node.js to return the transaction hash.
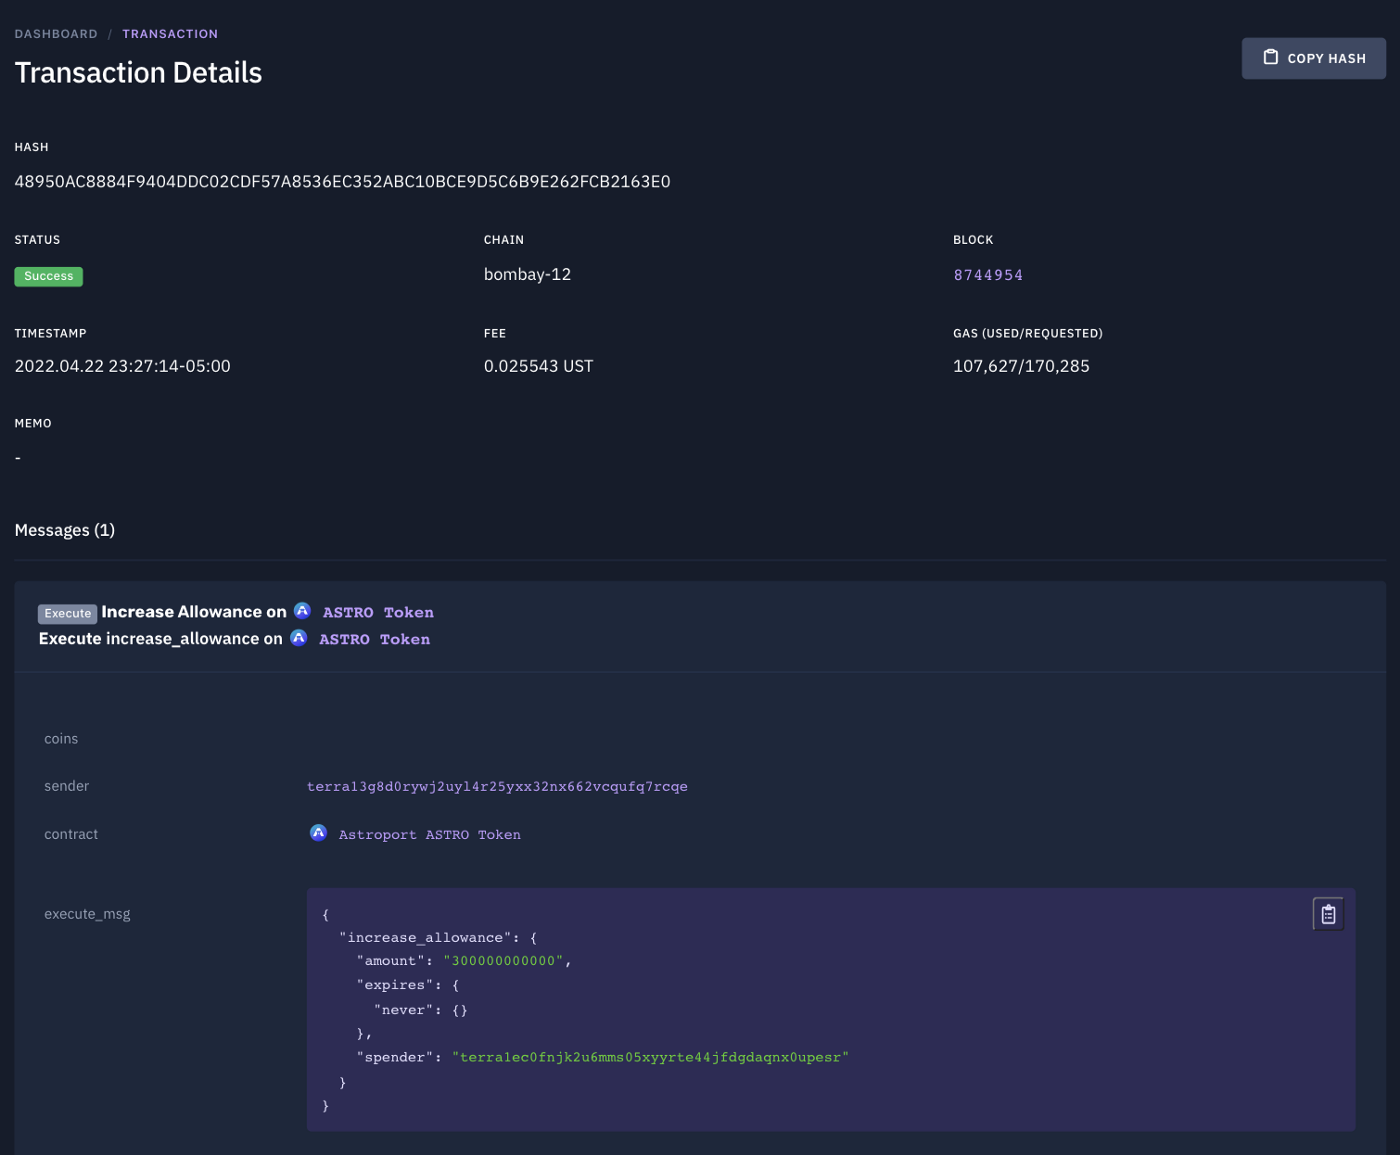
Returns:

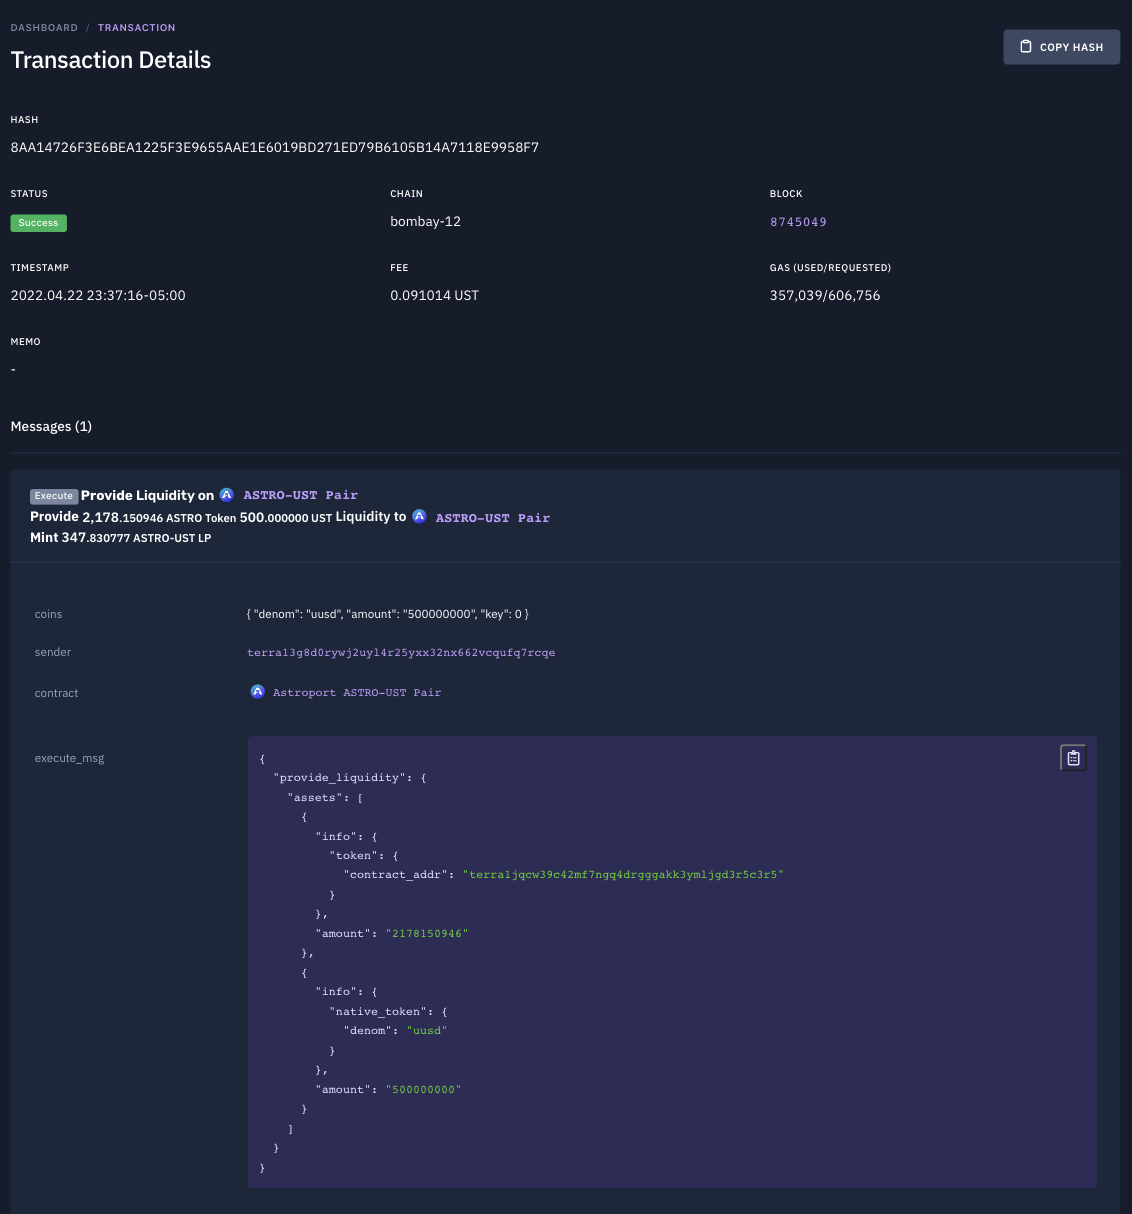
We can use this to get more information about our transaction using a Terra explorer like terrascop.pe
Now that we have queried the pair contract_addr and have increased our token allowance, we are ready to provide liquidity.
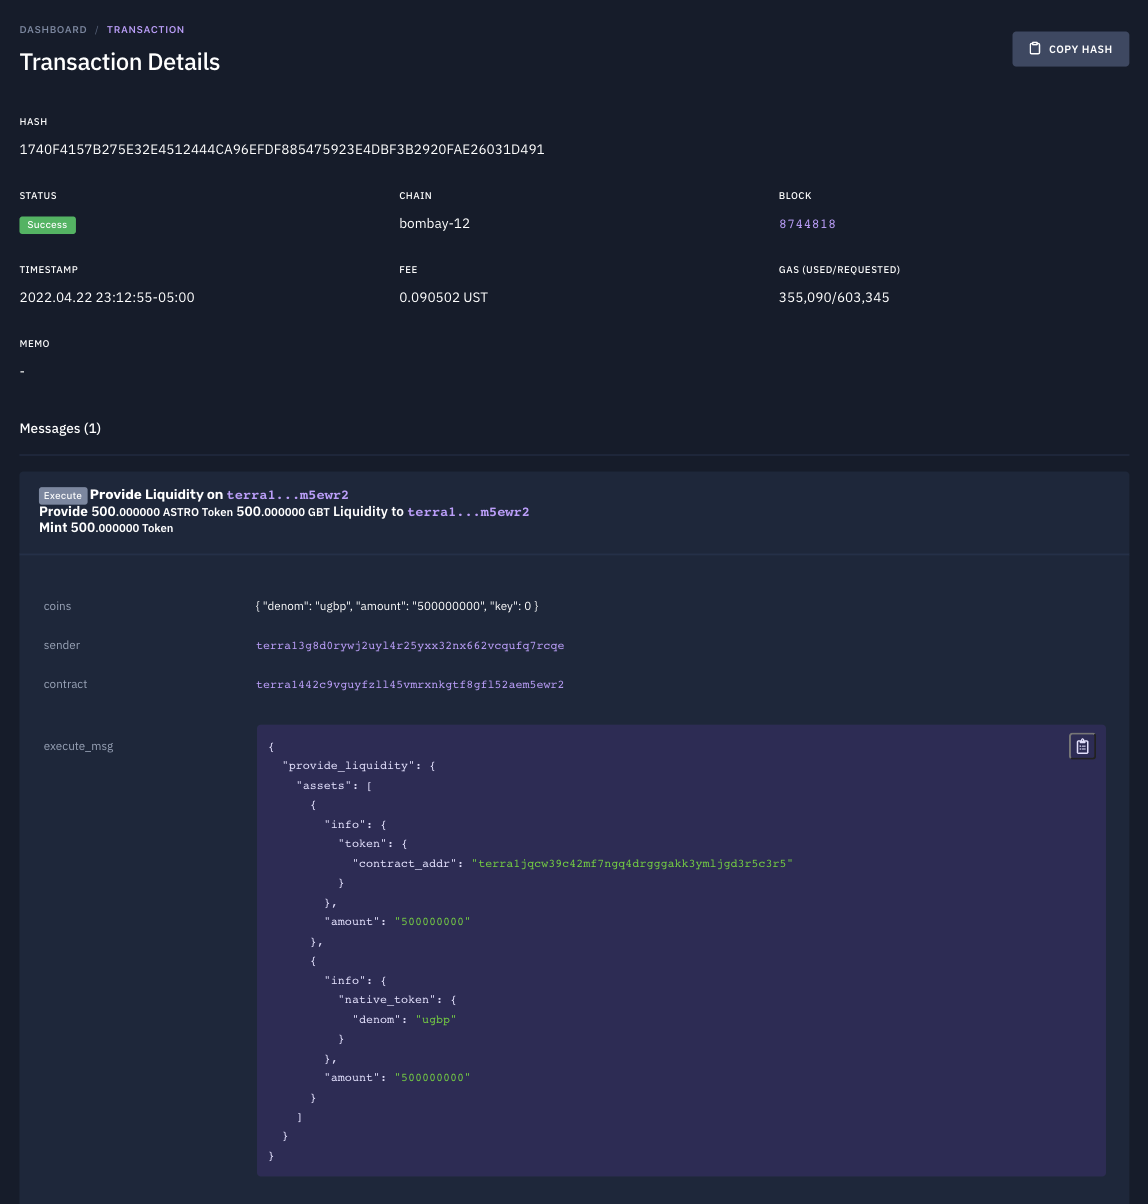
To provide liquidity, we will change our contract_address variable to the pair contract address that we’re providing liquidity for. In this case, the ASTRO-GBT pair address.
When an address executes the provide_liquidity operation, it provides liquidity by sending a user’s native or token assets to the pool. Since this is a new pool without any previous token balance or ratios, you will be able to provide whatever ratio of tokens in a pair. Arbitrage will resolve the imbalance of price, which also incentivizes initial deposits to be as close as possible to external oracle prices. Note that you will have to add a new fourth parameter to the MsgExecuteContract call for native tokens being sent. In our example, ugbp for GBT.
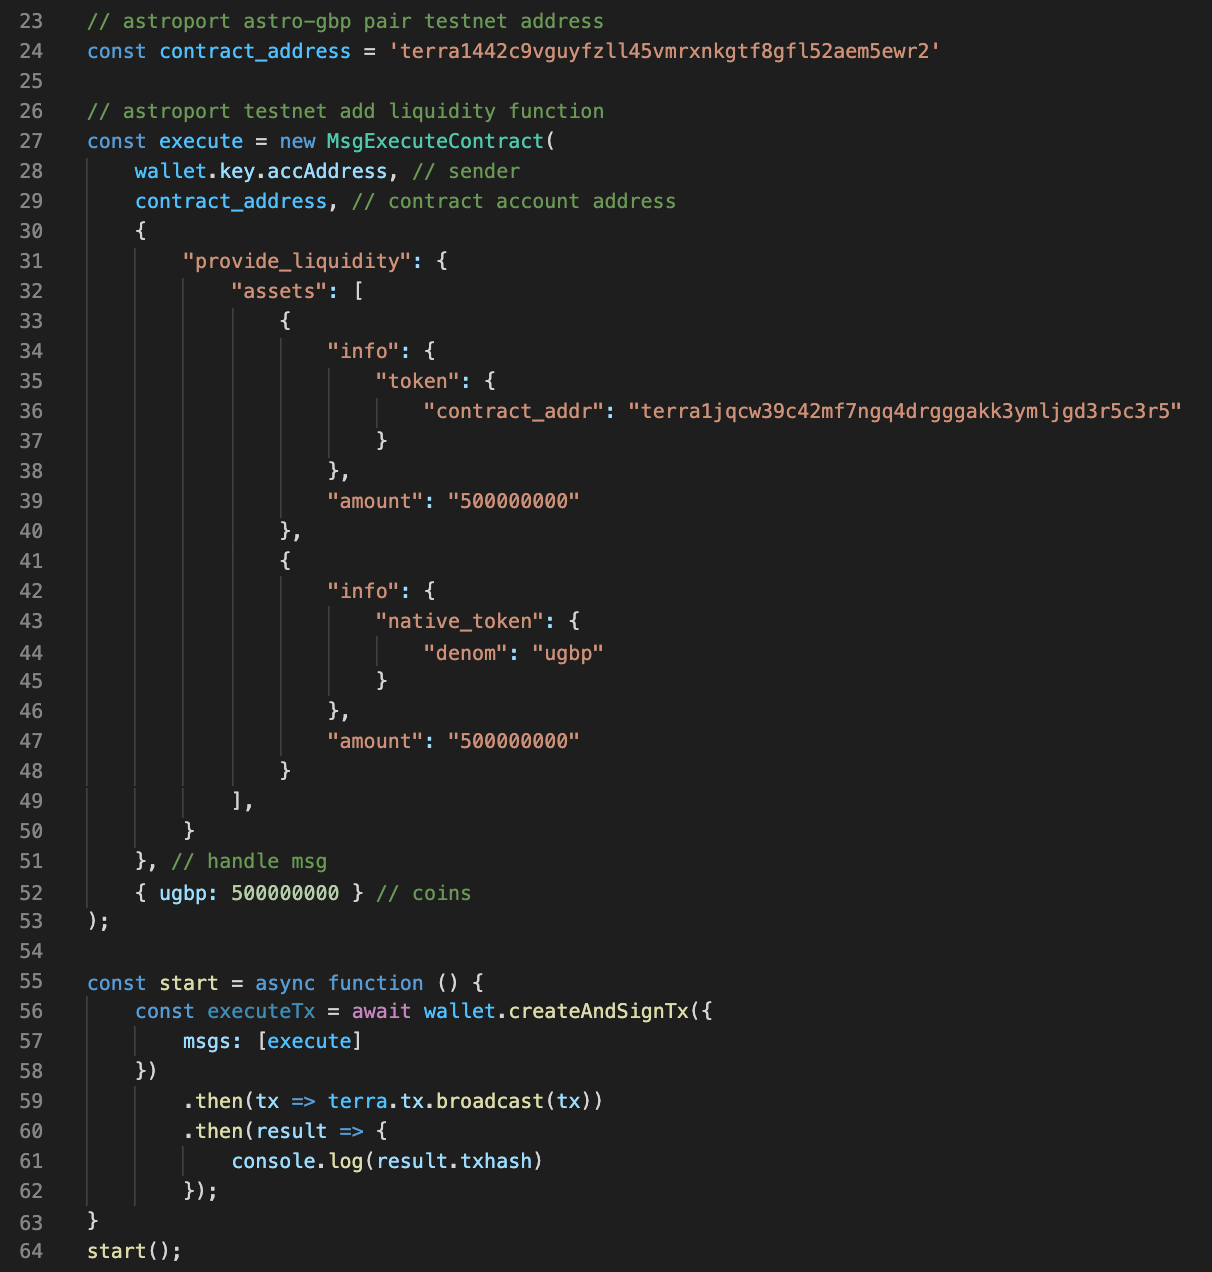
To execute this call, we use the terminal and node.js to return the transaction hash.
Returns:

Congrats! You’ve provided liquidity to your new pool by calling the pair contract directly! We can use the transaction hash that’s returned to get more information about our transaction using a Terra explorer like terrasco.pe
Providing liquidity to an existing pool
Providing liquidity to an existing pool is similar to providing liquidity for empty pools. The notable difference is that the “provide_liquidity” call will throw an error message if the proper balance of ratios between tokens is not met.
Like the previous tutorial, two things you need to do before you can provide liquidity: query for the contract address of the pair and increase your token allowance. However, for existing pools, you will also have to simulate the token ratio to input a correct balance of tokens.
First, to query the token address of the pair, we call the pair query to the factory contract with our asset information. In our example, we will be using the ASTRO-UST pair.
To execute the console.log request, we use the terminal and node.js to return the contract_addr for the pair as well as the liquidity_token address and the pair_type.
Returns:
Next, we will need to approve the token allowance on any CW20 tokens we want to provide liquidity for. For our ASTRO-UST pair, we will need to call the ASTRO token contract_address.
The increase_allowance function on a give CW20 takes in a spender, in our case the ASTRO-USD pair contract_addr that we just queried, as well as an amountand an expiration. For more information on increase_allowance, visit here.
To execute this call, we use the terminal and node.js to return the transaction hash.
Returns:

We can use this to get more information about our transaction using a Terra explorer.
Lastly, before we are able to provide liquidity, we will need to call the pair contract address to simulate our swap and get the correct ratio for our token balance. Note that we are switching our contract_address variable to the ASTRO-UST pair contract address to call the simulation query.
The simulation query for a given Astroport Pair contract simulates a swap and returns the spread and commission amounts. The query takes in an offer_assetwhich can include a CW20 contract_addr or a native_token denomination (denom) depending on the pair. In the case of the ASTRO-UST Astroport Pair, we can call the simulation query and specify the offer_asset as either a CW20 contract_addr for ASTRO or a native_token denomination (denom) for UST.
The query returns a return_amount with the latest exchange rate for the pool, along with the spread_amount, and the commission_amount. In our case, we specify the return_amount in our result.
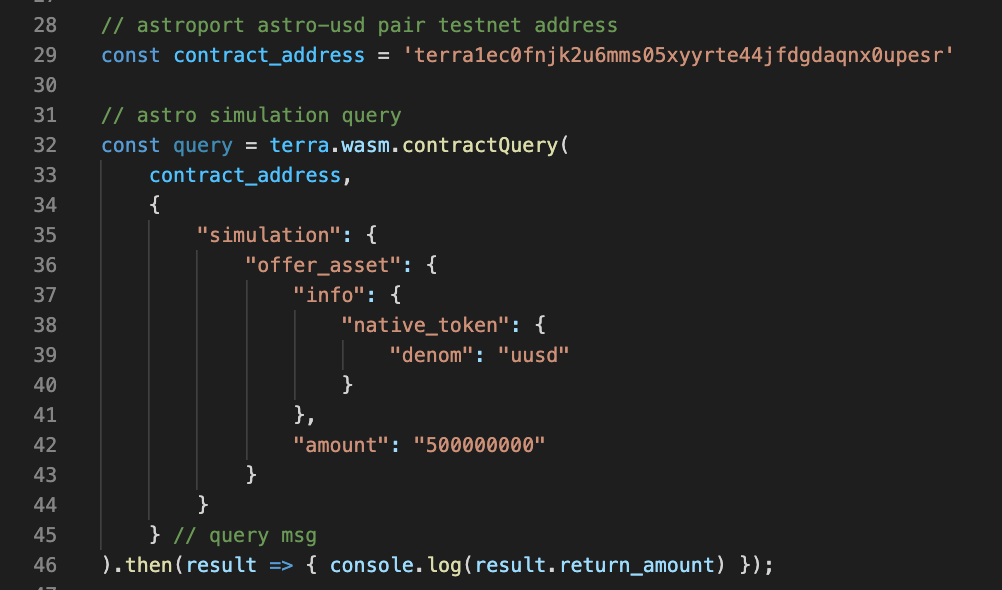
To execute the console.log request, we use the terminal and node.js to return the latest exchange rate for the pool (return_amount).
Returns:

Finally, we are able to provide liquidity for an existing pair. When an address executes the provide_liquidity operation, it provides liquidity by sending a user’s native or token assets to the pool. Since this is an existing pool, we need to input a proper balance of tokens. We get the proper balance of tokens from the previous step using the simulation query. Use the output of the previous query as the input to the amount parameter for the respective token in question. Note that you will have to add a fourth parameter to the MsgExecuteContract call for native tokens being sent (uusd in this case).
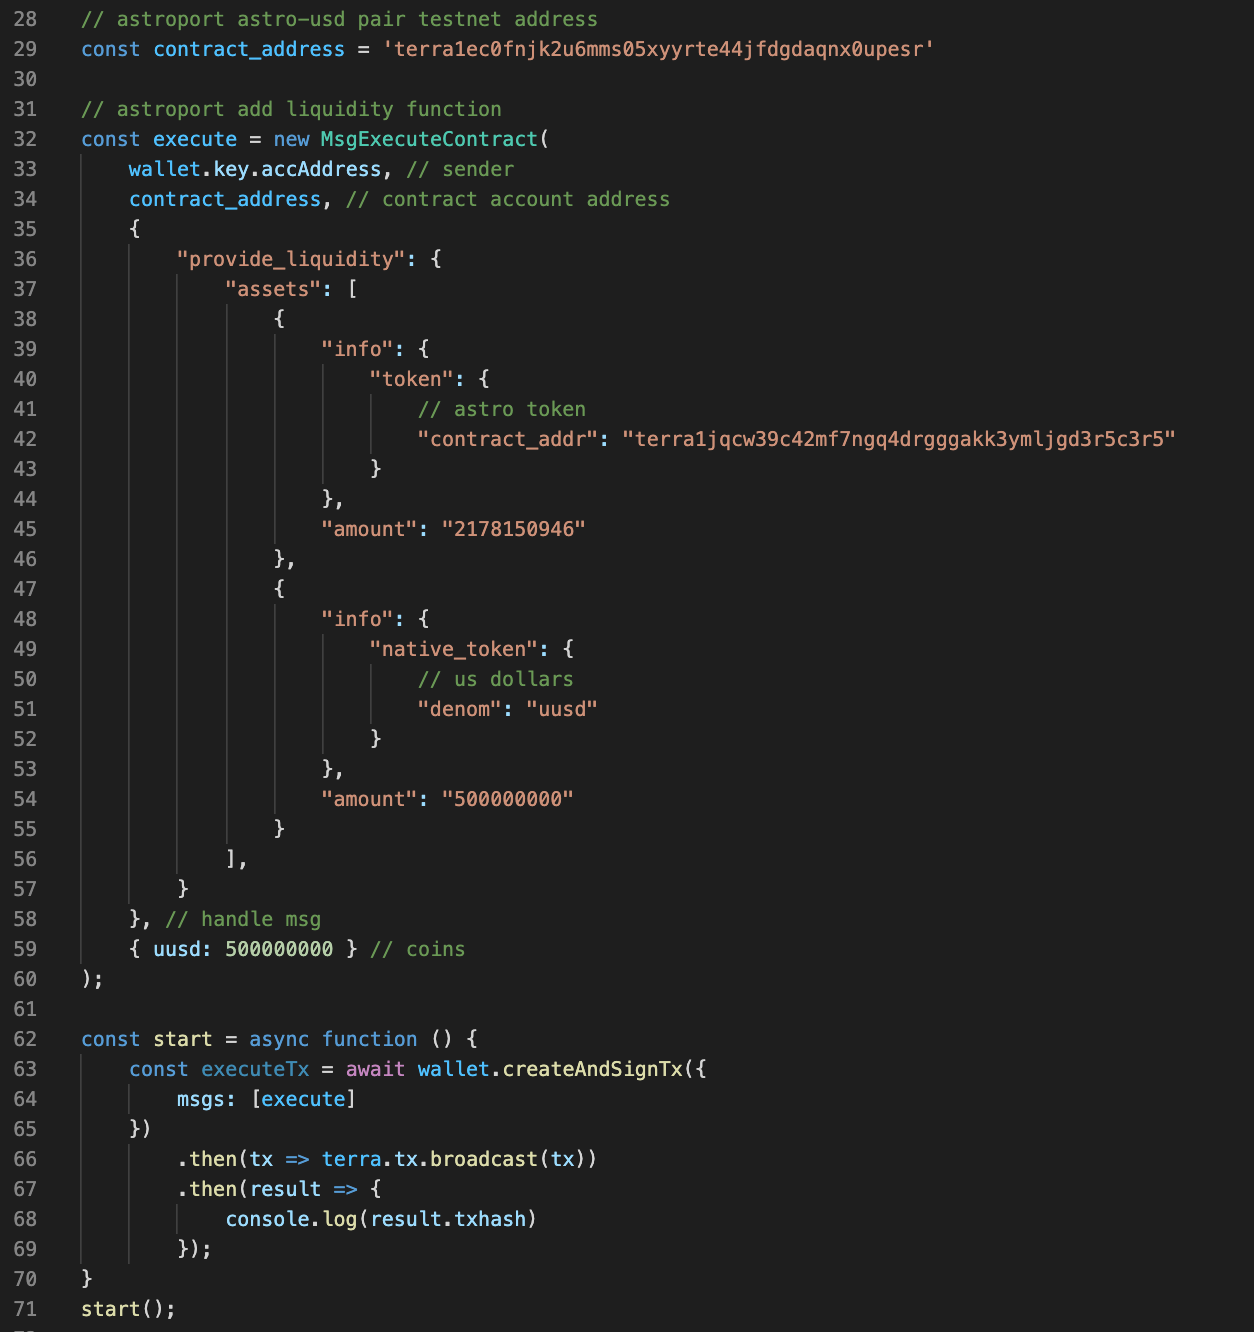
To execute this call, we use the terminal and node.js to return the transaction hash.
Returns:

Congrats! You’ve provided liquidity to an existing pool by calling the pair contract directly. We can use the transaction hash that’s returned to get more information about our transaction using a Terra explorer like terrasco.pe
Providing single-sided liquidity to a stableswap pool
Providing single-sided liquidity to stableswap pools is similar to providing double-sided liquidity. The notable difference is that the provide_liquidity call can have an amount of 0 for one side of the liquidity pair. Note that this can only be done for pools that already have liquidity (not for empty pools).
Like our previous tutorials in this section, two things you need to do before you can provide liquidity: query for the contract_addr of the pair and increase your token allowance. Note that you don’t need to call the simulate query in this case since you’re inputting 0 for one side of the pair and don’t need a token balance.
First, to query the token address of the pair, we call the pair query on the factory contract with our asset information. For this example, we will be using the bLUNA-LUNA pair.
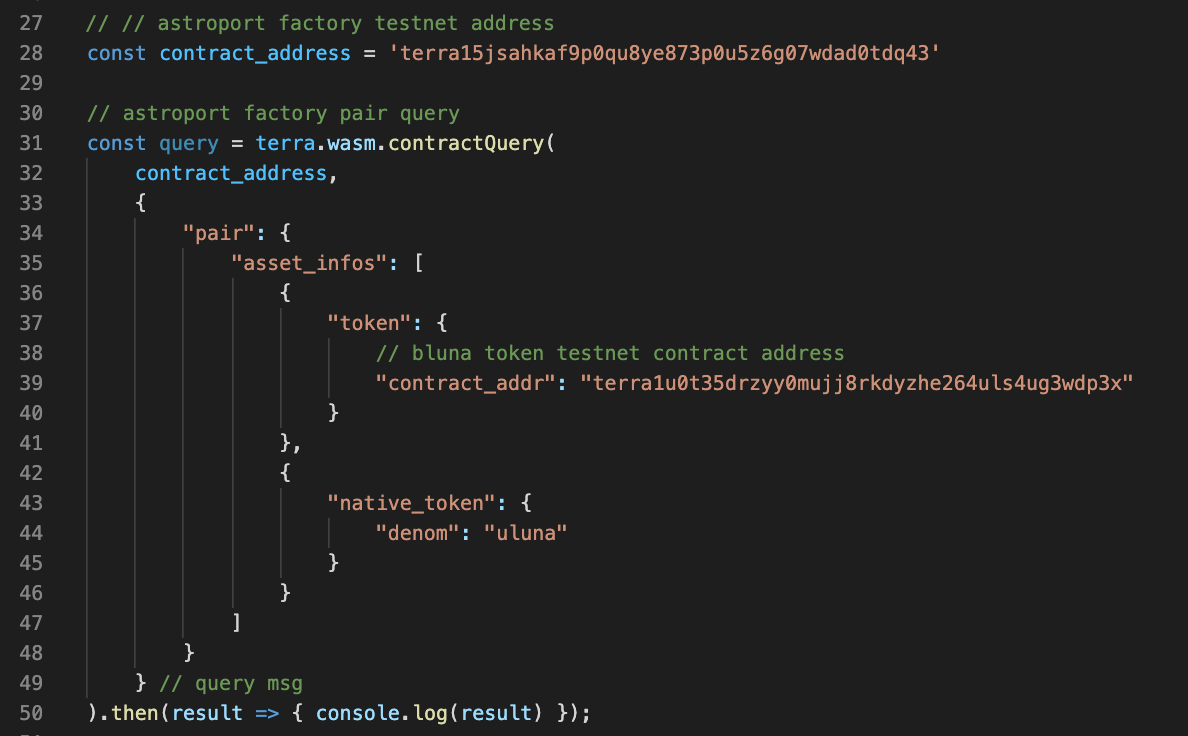
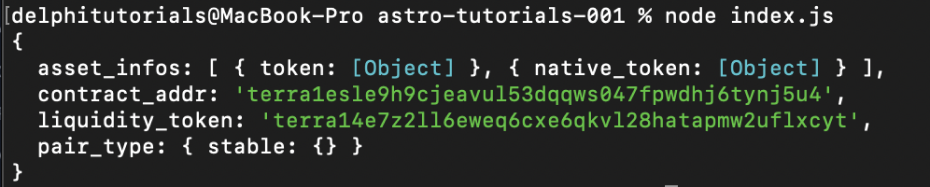
To execute the console.log request, we use the terminal and node.js to return the contract_addr for the pair as well as the liquidity_token address and the pair_type.
Returns:
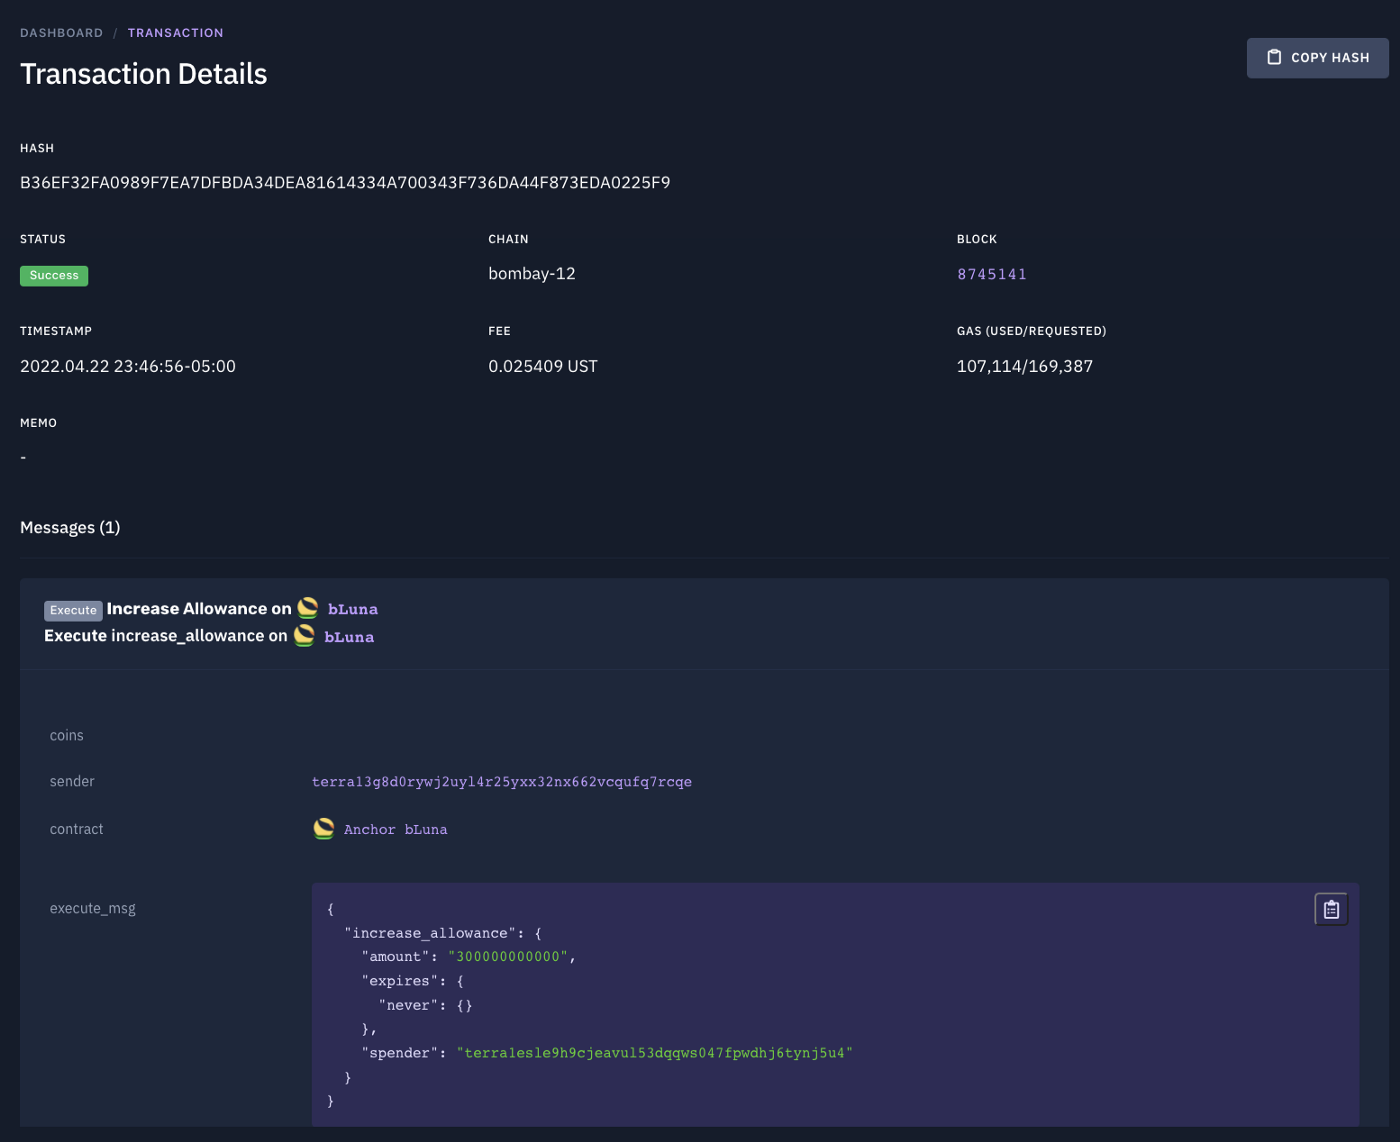
Next, we will need to approve the token allowance on any CW20 tokens we want to provide liquidity for. In this case, we will use the bLUNA token contract address and will need to change our contract_address variable to reflect this.
The increase_allowance function on a give CW20 token takes in a spender, in our case, the bLUNA-LUNA pair contract_addr that we just queried, as well as an amount and an expiration. For more information, visit here.
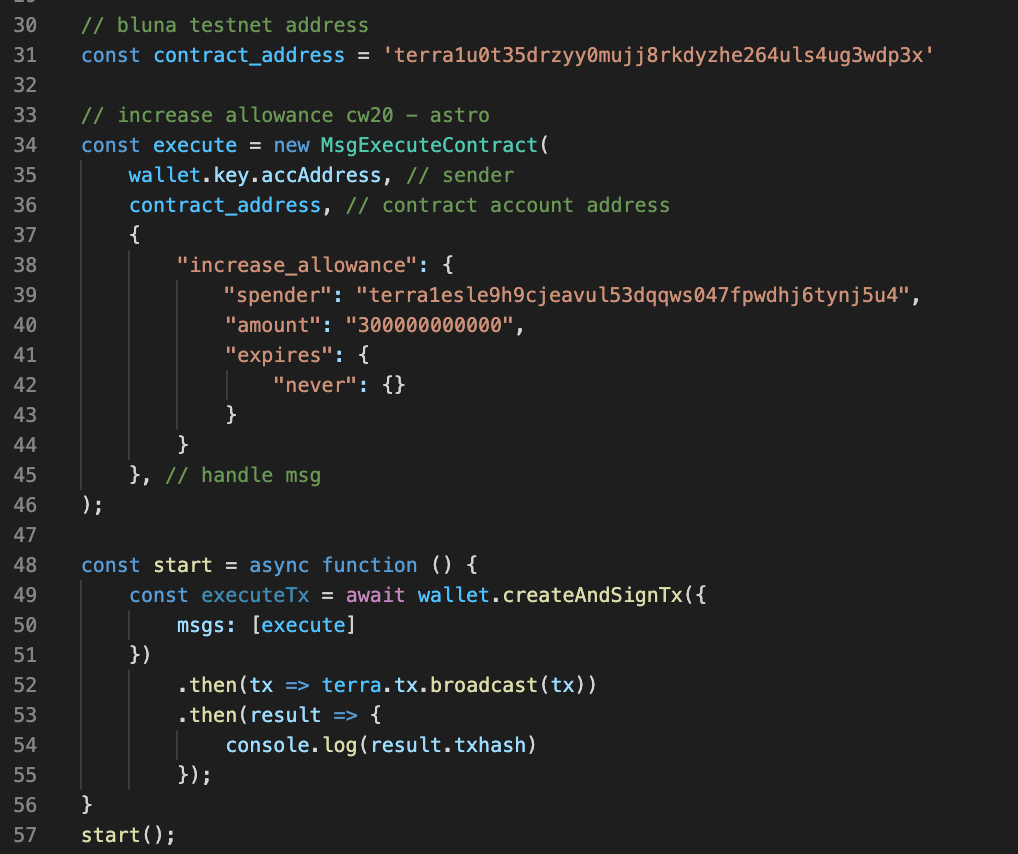
To execute this call, we use the terminal and node.js to return the transaction hash.
Returns:

We can use this to get more information about our transaction using a Terra explorer.
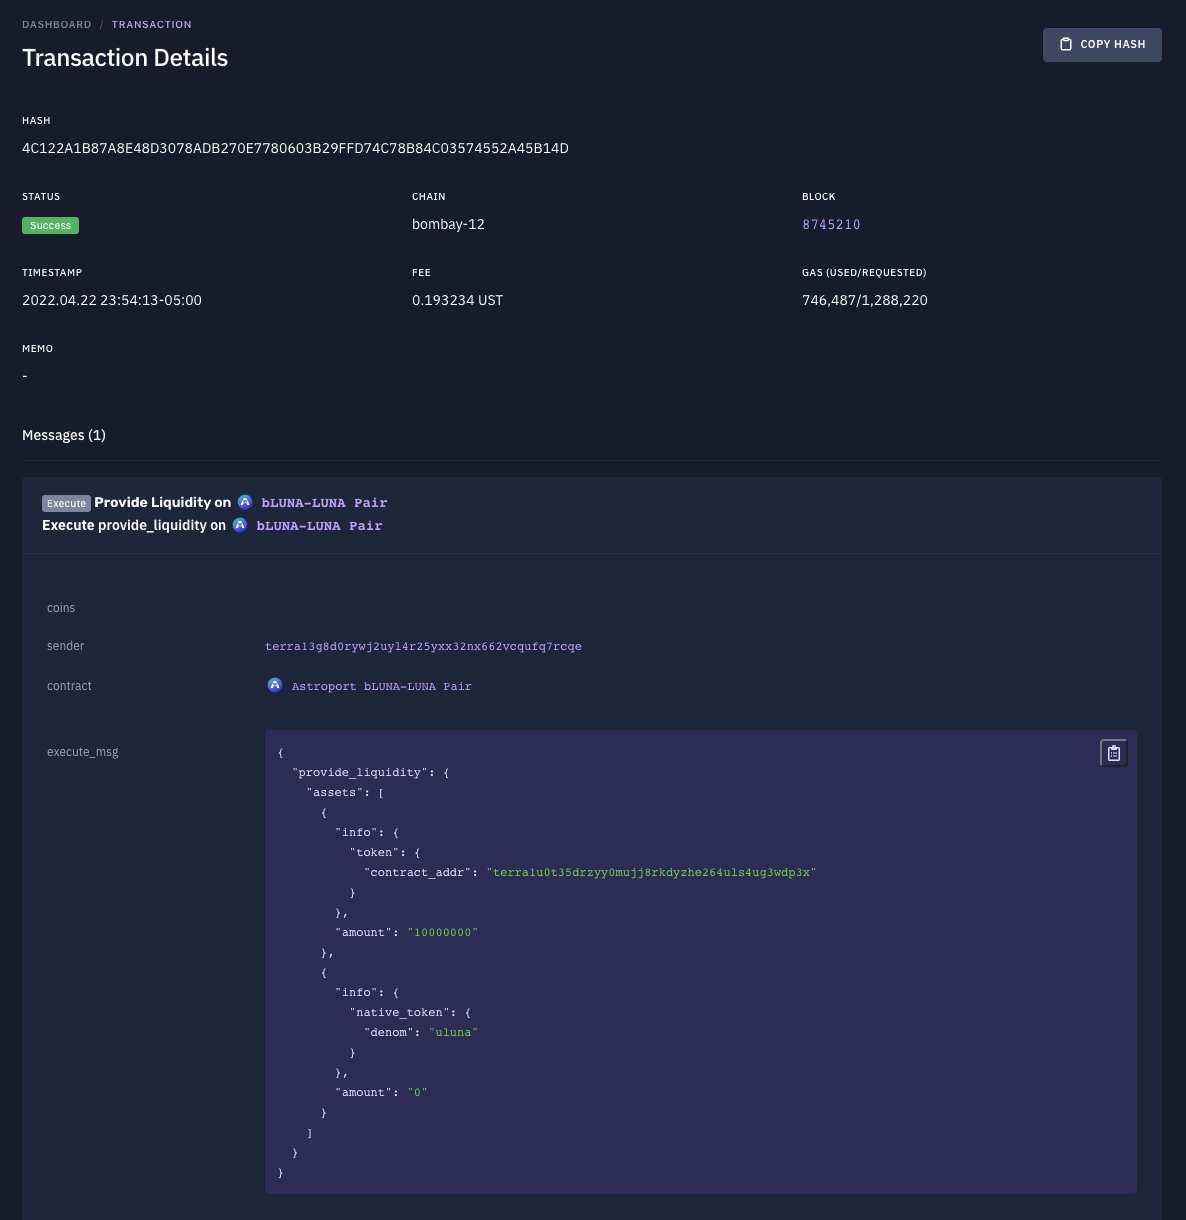
Finally, we are able to provide single-sided liquidity for an existing stableswap pair. When an address executes the provide_liquidity operation, it provides liquidity by sending a user’s native or token assets to the pool. For single-sided liquidity, we input the amount we want to provide for one side of the pair and set the amount for the other side to 0. Note that you may have to add a fourth parameter to the MsgExecuteContract call for native tokens being sent (“uluna” for example). In our case, we are providing 0% LUNA and 100% bLUNA so this parameter is not required.
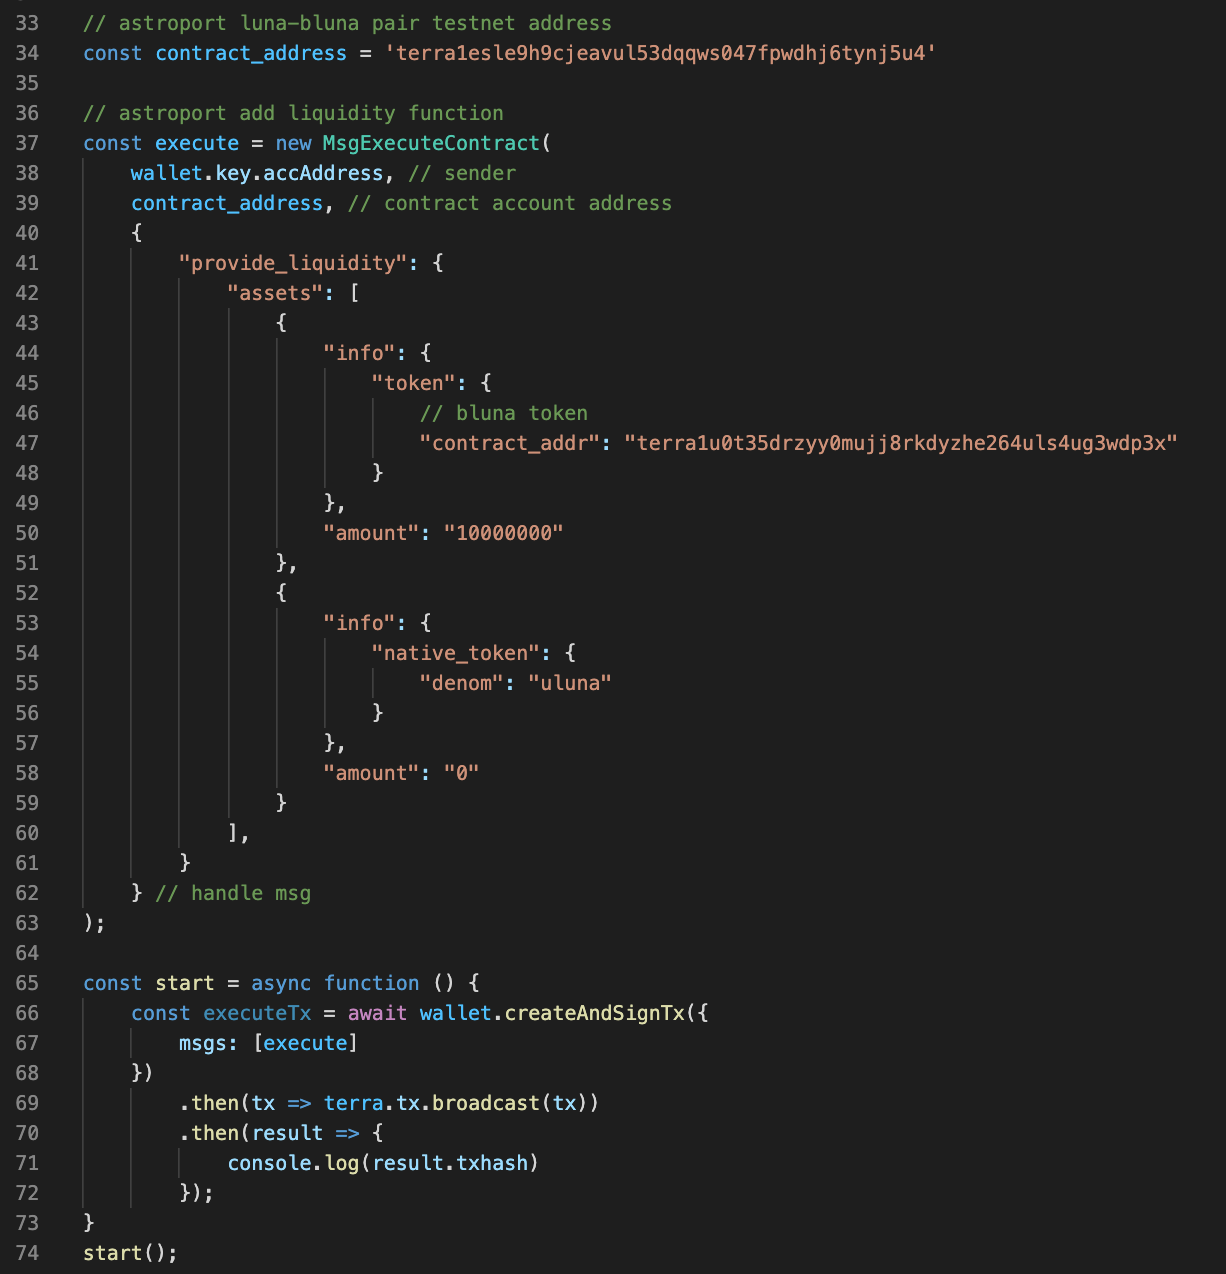
To execute this call, we use the terminal and node.js to return the transaction hash.
Returns:

Congrats! You’ve provided single-sided liquidity to an existing stableswap pool by calling the pair contract directly. We can use the transaction hash that’s returned to get more information about our transaction using a Terra explorer like terrasco.pe
Optional parameters
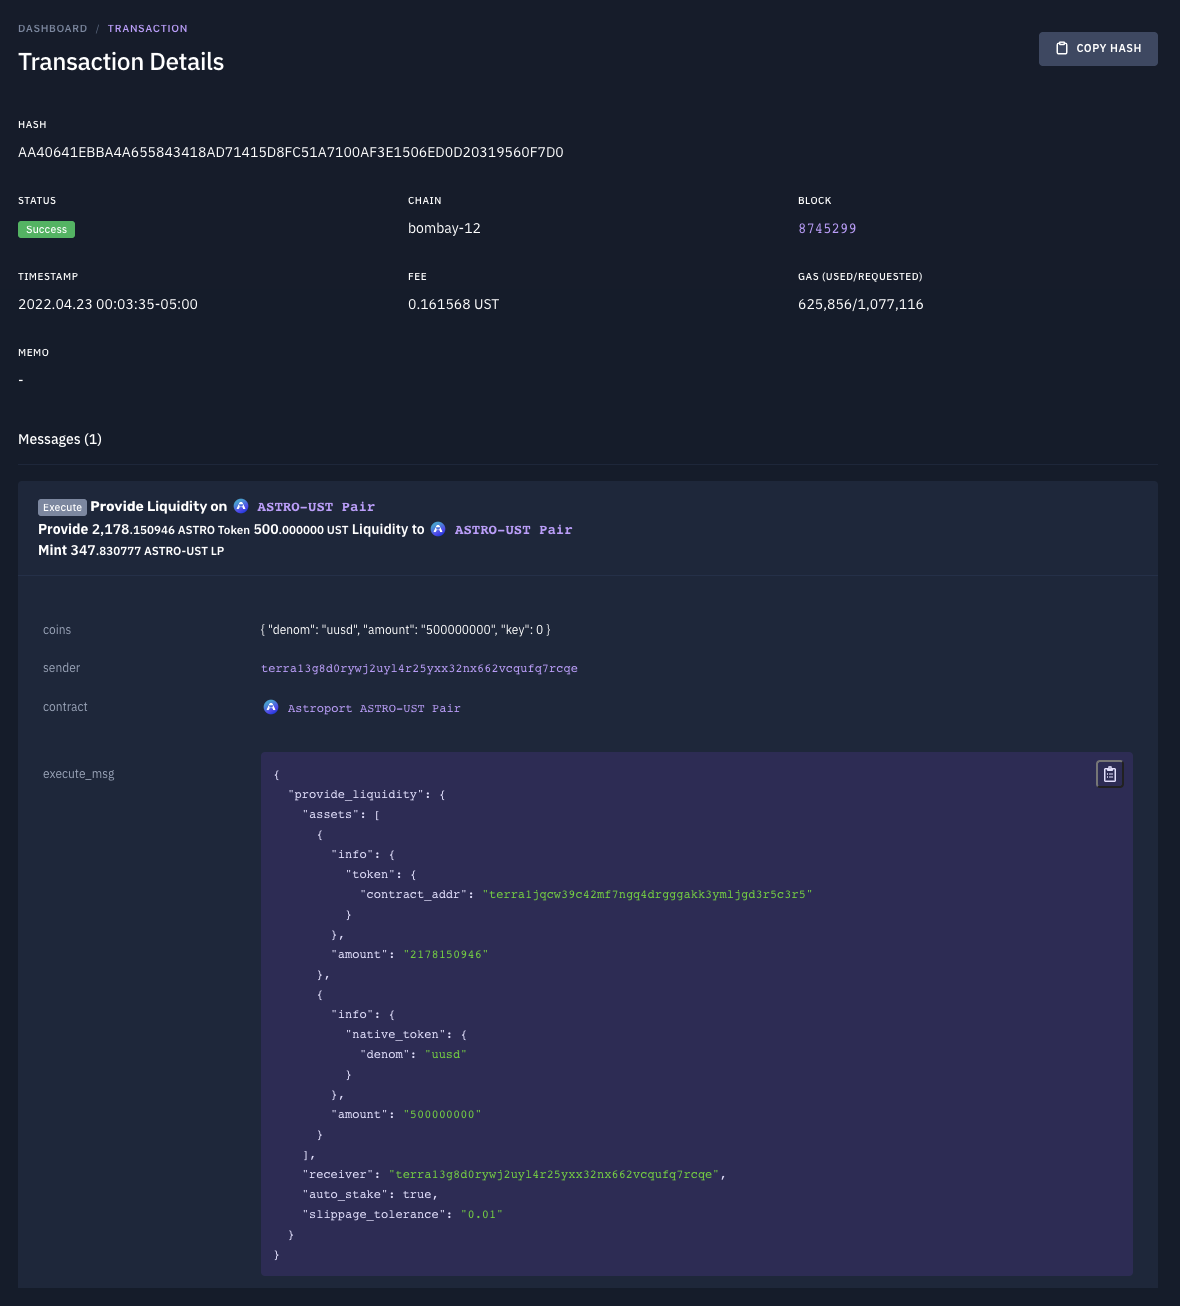
We can also specify optional parameters when providing liquidity in any of the above three tutorials for this section. For this final tutorial on providing liquidity, we will be using the ASTRO-UST pair address and we have already increased our allowance for this contract.
Our MsgExecuteContract call is similar to the second tutorial in this section, except it also specifies a slippage_tolerance, whether we want our rewards to auto_stake, and the receiver address to claim rewards (can be different from the sender).
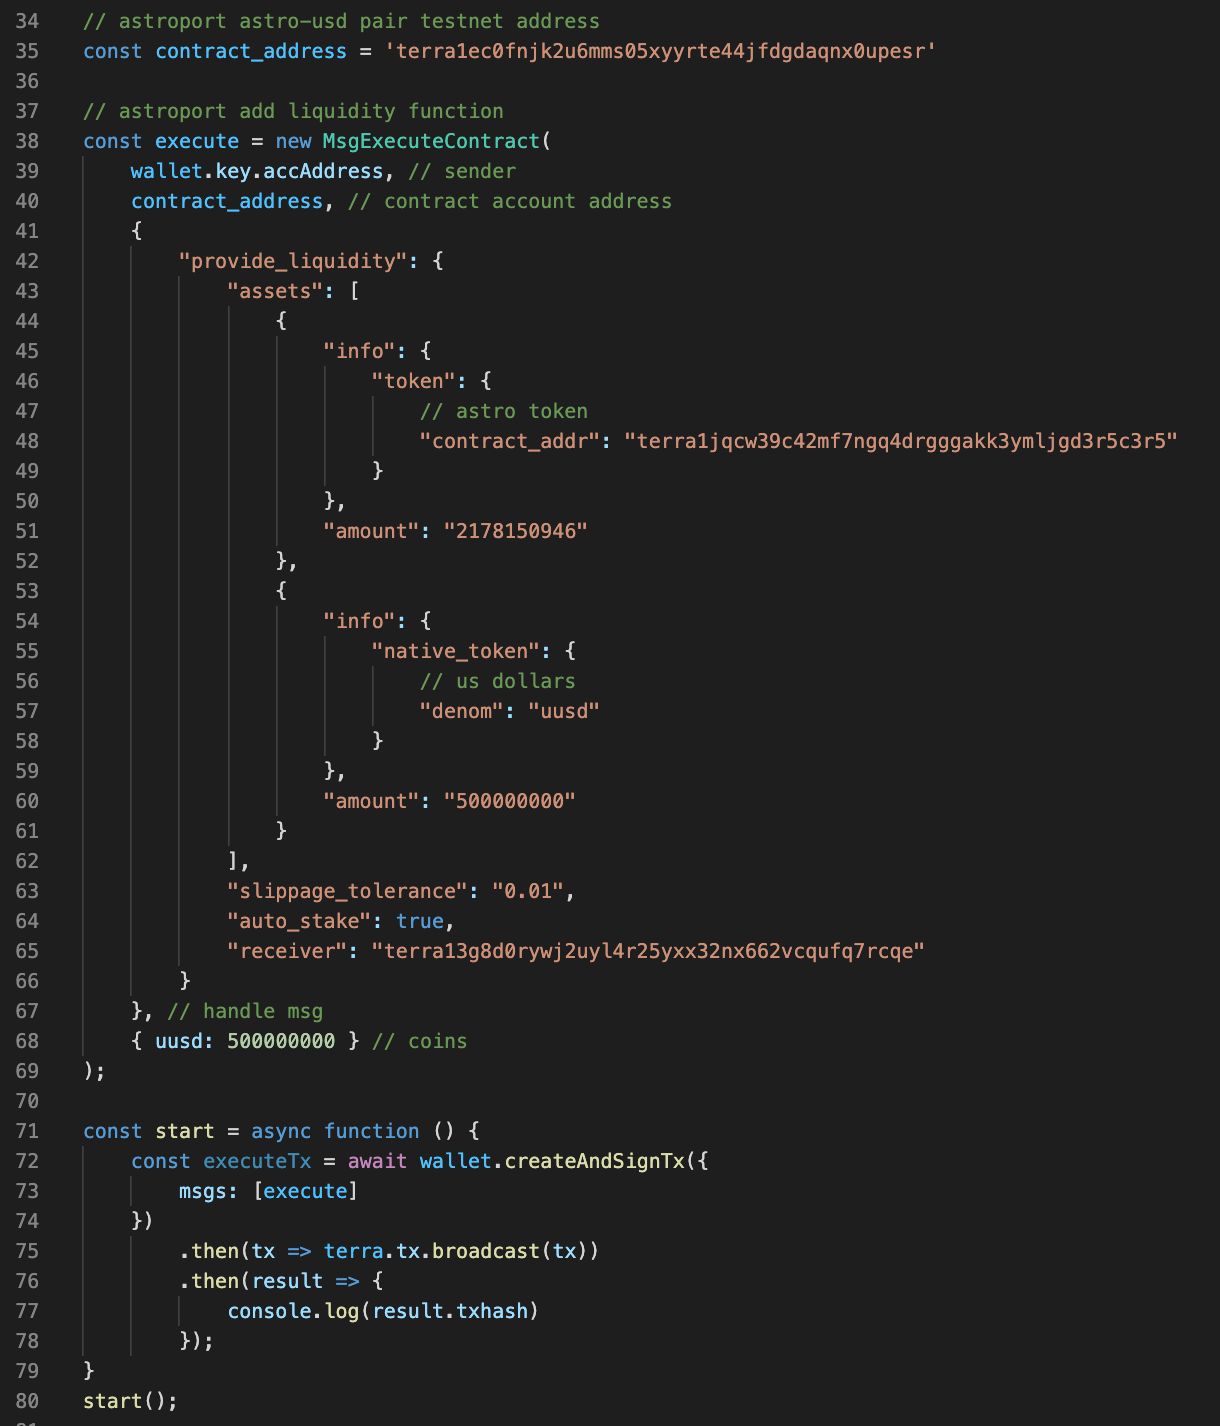
To execute this call, we use the terminal and node.js to return the transaction hash.
Returns:

Congrats! You’ve provided liquidity by specifying additional parameters. We can use the transaction hash that’s returned to get more information about our transaction using a Terra explorer like terrasco.pe
Congrats! You’ve completed all of the tutorials!
For more information regarding Astroport smart contracts, visit the Astroport docs.
✦
Follow Astroport on Twitter and subscribe to the Astroport email newsletter to get the latest alerts from the mothership.
DISCLAIMER
Any mention of third-party protocols is not an endorsement. As always, DYOR. This article does not constitute investment advice. Before interacting with Astroport, review the project disclaimers here.